® EPSON ActionLaser™1600 Read This First
This booklet is to help you set up your printer and begin printing quickly. It also gives you instructions for routine maintenance. If you need detailed information on printer use or if you have problems printing, see your Reference Guide. HP, LaserJet, and HPGL/Z are registered trademarks of Hewlett-Packard Company. General Notice: Other product names used herein are for identification purposes only and may be trademarks of their respective companies.
Contents 1 Unpacking.. . . . . . . . . . . . . . . . . . . . . . . . . . . . 2 Installing the imaging cartridge . . . . . . . . . . . . . . . . . 3 Loading paper . . . . . . . . . . . . . . . . . . . . . . . . . . . 4 Attaching the power cord . . . . . . . . . . . . . . . . . . . . 1 1 4 6 7 8 5 Testing the printer . . . . . . . . . . . . . . . . . . . . . . . . 6 Connecting the printer to the computer . . . . . . . . . . . . 7 Testing the computer-to-printer connection . . . . . . . . .
1 Unpacking 1. Remove the accessories and printer from the shipping carton. 2. Set the printer on a flat, stable surface. Leave adequate room to provide sufficient ventilation. Allow enough room above the printer to be able to fully open its cover. 3. Take the packaging off the printer and the other items and store for future use. Note: The printer weighs about about 10 kg (22 lb) and should be lifted with cure. 2 Installing the imaging cartridge Caution: P Do not turn the imaging curtridge upside down.
1. Open the printer cover by pressing the latch on the left toward you. 2. While holding the imaging cartridge horizontally, gently shake it a few times to distribute the toner evenly.
3. Set the imaging cartridge on a clean, flat surface Firmly grip the tab on the left side of the cartridge. Pull the clear seal all the way out with firm, even pressure, as shown. 4. Hold the imaging cartridge and gently shake it from front to back.
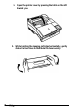
5. Insert the cartridge into the printer by placing the pins on each side of the cartridge into the grooves inside the printer. Slide it gently into the opening until it stops. 6. Gently press down on the printer cover until it clicks shut. Caution: Whenever you ship or transport the printer, first remove the imaging cartridge and place it in a plastic bag. Seal the bag to prevent the fine toner particles from spilling into the printer or onto your clothing. 3 Loading paper 1.
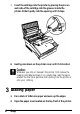
3. Adjust the paper guides inside the paper tray to match the size of the paper. Load a stack of paper (up to 150 sheets) into the paper tray. Make sure the paper guides do not press the paper too tightly. 4. Close the paper cover. 5. Install the paper stopper into the slot on top of the paper cover to match the size of the paper in the tray.
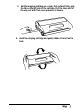
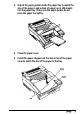
6. Make sure the paper path selector on the top left corner of the printer is set to the face-down position. Note: To load envelopes, heavy paper, or special stock such as labels and transparencies, feed sheets one at a time through the standard paper tray slot. See “Printing on Special Paper” in Chapter 2 of your Reference Guide. 4 Attaching the power cord 1. Make sure the power switch at the top right of the printer is turned off. 2. Insert the power cord into the back of the printer.
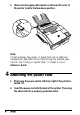
Use a grounded, three-prong electrical outlet. Do not use an adapter to fit the three-prong plug into a two-hole outlet. Avoid using an outlet that is controlled by wall switches or automatic timers. Accidental disruption of power can wipe out valuable information in your computer’s or printer’s memory. Also avoid outlets on the same circuit with large motors or appliances that might disturb the power supply. 5 Testing the printer To test whether the printer is correctly installed, print a status sheet.
To print a status sheet: 1. Make sure the imaging cartridge is installed. Turn on the printer. Several messages appear as the printer performs internal tests. After about 35 seconds, the READY message appears in the printer’s control panel. ™ 2. Press the Menu button to enter SelecType. 3. Press the Menu button several times until TEST MENU appears on the display. 4. Press the Item button; you should see STATUS SHEET on the display. 5. Press the Enter button.
2. Connect a properly shielded interface cable to the appropriate interface connector. Parallel cables should be the twisted-pair shielded type. 3. Secure the connector to the printer. For the parallel connector, squeeze the wire clips together until they lock in place on either side of the connector. For the serial connector, use a screwdriver to fasten the screws of the connector, if required. If your cable has a grounding wire, connect it to the printer’s ground connector as shown.
4. Fasten the other end of the cable to your computer. For the parallel connector, squeeze the wire clips together until they lock in place on either side of the connector. For the serial connector, use a screwdriver to fasten the screws of the connector, if required. 5. Insert the interface cable into the U-shaped part of one cable clip. Lift the left side of the printer up slightly.
7 Testing the computer-to-printer connection If you are using the parallel interface port, use the following procedure to make sure you properly connected your computer to the printer. If you are using the serial interface or an optional interface, skip this procedure. 1. Turn on your computer; then turn on your printer. 2. Bring up a DOS prompt on your computer screen such as: c:> 3. Type the following: PRINT AUTOEXEC.BAT The computer displays the following message: NAME OF LIST DEVICE (PRN): 4.
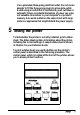
8 Setting up your software Choosing an emulation Your printer has several resident printer emulations: ® ® ® ™ HP LaserJet 4 (LJ4), Epson ESC/P 2, Epson FX, and Epson GL/2. The LJ4 emulation is the default setting and gives you the fullest range of features. Normally you will want to use the LJ4 emulation. The only times you will need to change the emulation are the following: P You need to print documents already formatted for a dot matrix printer.
Note: Your software manual and technical support representative are your best sources for information on installing your drivers. Many software manufacturers provide technical support phone assistance for helping you install your printer drivers. ® ™ Microsoft Windows To select a printer driver using Microsoft Windows: 1. In the Main window, double-click on the Control Panel icon. 2. Double-click on the Printers icon. 3. In the Printers dialog box that appears, choose the Add button. 4.
If an LJ4 driver is not available, contact Windows Support at (206) 637-7098 to obtain a copy. With a modem, you can obtain the latest Microsoft drivers files from the Microsoft bulletin board system at (206) 436-6735. Windows drivers ® ® can also be downloaded from CompuServe or GEnie. If you are not currently a member of CompuServe but would like to become one, see page 2 of the Reference Guide for a special membership offer.
Non-Windows software Since each program differs in its setup capabilities, there is no standard way to select the printer driver. See your software manual for information on how to select an HP LaserJet 4 driver. Using the serial interface If you are using the serial interface, you need to ensure that the printer and the computer are using the same serial settings. If the serial settings do not match, you must change the appropriate settings. The settings can be changed either at the printer or computer.
2. Double-click on the Printers icon. 3. In the Printers dialog box that appears, choose the Connect button. 4. Select a COM (serial) port. 5. Choose the OK button. 6. Close the Printers dialog box. Using Energy wisely By purchasing this low-power, Energy Star compliant printer, you join a growing number of users concerned about conserving energy. Here are a few additional tips you can use to be even more energy-wise. 0 If your monitor isn’t Energy Star compliant, turn it off when you’re not using it.
Maintenance Replacing the Imaging Cartridge The imaging cartridge prints up to 6,000 pages depending upon the complexity of your print jobs. If your printed images become faint, you can use the printer’s control panel to determine how much toner remains in the imaging cartridge. To do so, press the Menu button until CONFIG MENU appears in the display. Then press the Item button until the TONER item appears. Count the asterisks between the E (empty) and the F (full).
2. Gently open the printer cover and remove the imaging cartridge by pulling it toward you. 3. Dispose of the used imaging cartridge with nonburnable items. CUUtion: P Do not turn the imaging cartridge upside down. 0 Do not expose the imaging cartridge to light any longer than necessary. 4. Remove the new imaging cartridge from its aluminum bag. While holding the cartridge horizontally, gently shake it a few times to distribute the toner evenly. frp$ -0 c 5.
6. Hold the imaging cartridge and gently shake it from front to back. 7. Insert the imaging cartridge into the printer by placing the pins on each side of the cartridge into the grooves inside the printer. Slide it gently into the opening until it stops. 8. Gently press down on the printer cover until it clicks.
Feed Jam When the printer stops printing and the FEED JAM message appears, follow these steps: 1. Open the paper cover. Carefully remove all the paper in the paper tray along with any sheets that have fed part way into the printer. 2. If the paper tears when you remove it, make sure you remove any pieces remaining in the printer. To do this, gently open the printer cover. Opening the printer cover exposes the fuser, which is marked by a CAUTION HOT SURFACE label. Be careful not to touch the fuser.
3. Remove the imaging cartridge. Next remove any paper from the paper feed path and reinsert the imaging cartridge. 4. Close the printer cover. 5. Tap the edges of the paper stack on a flat surface and carefully reload it into the paper tray. (Do not reload curled or wrinkled sheets.) Close the paper cover. The jammed page is automatically reprinted. If you did not open the printer cover to clear the feed jam, press the Continue button.
2. Gently pull out the paper. The direction you should pull depends on where the paper is jammed. If it tears, make sure you remove any pieces remaining in the printer. Note: Because the toner on the paper inside the printer may not have been fixed on the page, toner may come off on your hands when you remove the paper. If you spill toner on your clothing, rinse it of with cold water. Using hot water may leave a permanent stain. 3. Reinstall the imaging cartridge. 4. Close the printer cover.