
Service manual


4-1
4.1 Before Starting Troubleshooting Procedures
1. Before you replace a unit or block, double-check that it is actually defective. (For
example, check that cables are connected properly.)
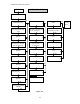
2. Find the points you want to check by examining the flowchart, and check those items
during the troubleshooting procedure.
3. See instructions in Chapter 3, "Disassembly and Assembly," to replace projector units.
4. Before making a functional check, check connections.
5. After replacing any unit listed below, make adjustments explained in Chapter 5.
Table 4-1.
No. Name
1 Optical Unit
2 Driver board
3 Main board
4 ROM (IC304) on the main board
6. After troubleshooting, make functional checks using the image adjustment program
explained in Chapter 5, and verify that the problem has been solved.
4.1.1 Tools and Accessories Required for Troubleshooting
Tools and accessories required for projector troubleshooting (including fault isolation) are
listed below.
Table 4-2.
Name Quantity Use / Remarks
Projector screen 1 To project images
Ruler (10 feet, 3 m) 1 To measure the projection distance
Small-size mirror 1 To check the optical axis (digital mirror or round mirror with a
diameter of approx. 2 cm)
Host computer 1 To supply test patterns (PC-compatible)
Color display 1 To manipulate and display on host computer
Video equipment 1 To test source 2 (video input) (video deck, video camera, etc.)
External speaker unit 1 To test voice output (with audio cable terminals)
Test program diskette 1 To adjust image quality
Multimeter 1 To measure resistances and voltages (AC/DC)
Tool set 1 set Tools and accessories listed in Section 3.1
Illuminometer 1 To measure illuminance
Color meter (chronometer) 1 To measure R, G, and B components
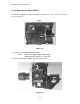
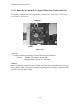
4.1.2 Field Replacement Parts
For a list of parts that may need be replaced during troubleshooting, such as boards,
cases, plates, and screws, refer to the parts list in the appendix of this manual.