
Operation Manual

Using the Projector on a Network
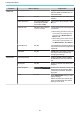
70
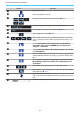
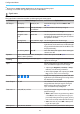
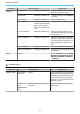
Button Function
a
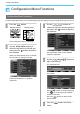
Displays the menu.
b
Turns the projector on or off.
c
Changes to the image from each input port. s p.26
d
Sets the image quality using the on-screen instructions.
e
Saves, loads, erases, or rename a memory. s p.42
f
Turns HDMI Link on or off. s p.61
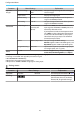
g
When HDMI Link is On, you can perform operations such as Play,
Stop, Fast Forward, Rewind, Next Chapter, Previous Chapter, and
Pause.
h
Sets the Color Mode, Frame Interpolation, Image Enhance-
ment, Color Temp., Gamma, RGBCMY,Lens Iris, Power Con-
sumption, and Auto Iris.
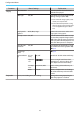
i
Specify 3D Display, 3D Format, 3D Depth, Diagonal Screen Size,
and 3D Brightness.
j
Adjusts the focus, zoom, and lens shift. You can also register the lens
position (Memory function) or display a test pattern (Pattern func-
tion).
k
Specify Aspect, Image Processing, Keystone, Reset All Config,
Reset Memory, Reset Lens Position, Lens Shift, Zoom, Focus,
Test Pattern.
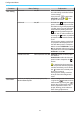
l
When HDMI Link is set to On, you can adjust the volume.
m
When HDMI Link is set to On, you can turn the image and audio on/
off temporarily.
s p.31
n
Opens the touch pad screen.
You can operate the Configuration menu by touching your touch
pad.
o
Selects the projector you want to control.