EasyMP Network Projection Operation Guide
Contents 2 Changing the Projector Search Method . . . . . . . . . . . . . . . . . . . . . . 24 Introduction to EasyMP Network Projection EasyMP Network Projection Features . . . . . . . . . . . . . . . . . . . . . . . . . 5 Display Options . . . . . . . . . . . . . . . . . . . . . . . . . . . . . . . . . . . . . . . . . . . . . 6 Multi-Screen Display Function . . . . . . . . . . . . . . . . . . . . . . . . . . . . Movie Sending Mode . . . . . . . . . . . . . . . . . . . . . . . . . . . . . . . . . .
Contents Solving Problems Solving Network Connection Problems . . . . . . . . . . . . . . . . . . . . . . 51 Solutions When You Cannot Connect Using Quick Connection Mode . . . . . . . . . . 51 Solutions When You Cannot Connect Using Advanced Connection Mode (Wireless) 52 Solutions When You Cannot Connect Using Advanced Connection Mode (Wired) . . 53 Solving Problems During Projection . . . . . . . . . . . . . . . . . . . . . . . . . 55 Solutions When the Computer Screen is Not Displayed Properly . . . .
Introduction to EasyMP Network Projection See the following sections to learn more about EasyMP Network Projection software. Related Links • "EasyMP Network Projection Features" p.5 • "Display Options" p.6 • "Connection Modes" p.
EasyMP Network Projection Features You can use EasyMP Network Projection software to project images from your computer to the projector over a network. Sharing the projector over a network allows you to project images from different computers without having to change cable connections, as well as project images from a remote location. Related Links • "Introduction to EasyMP Network Projection" p.
Display Options You can use a variety of display options for projecting images. Related Links • • • • • "Introduction to EasyMP Network Projection" p.4 "Multi-Screen Display Function" p.6 "Movie Sending Mode" p.6 "Presentation Mode" p.6 "Distribution Function" p.6 6 Movie Sending Mode You can play movies smoothly by sending movie files directly to the projector. a This function is only available for supported models.
Display Options a You cannot connect multiple networked computers to one projector at the same time. Related Links • "Display Options" p.6 • "Projecting One Computer Screen from Multiple Projectors" p.
Connection Modes You can use the following methods to connect a computer to a projector over a network by using EasyMP Network Projection. Related Links • "Introduction to EasyMP Network Projection" p.4 • "Quick Connection Mode" p.8 • "Advanced Connection Mode" p.8 8 Advanced Connection Mode You can connect the projector and the computer using an existing network system. To use Advanced Connection Mode, you need to connect the projector to an access point or to a network hub.
Setting Up EasyMP Network Projection for the First Time Follow these instructions before connecting a computer to the projector over a network. Related Links • "Installing the Software" p.10 • "Setting Up the Projector" p.
Installing the Software 10 Install EasyMP Network Projection from the EPSON Projector Software CD-ROM supplied with your projector. a Requirement • If the language selected for the installation differs from the language of the operating system being used, the screens may not be displayed correctly. • You can download the latest version of EasyMP Network Projection from the EPSON Web site.
Installing the Software a • Operation is not guaranteed for Windows XP without any service packs installed, or Windows XP Service Pack 1. • Operation is not guaranteed for Mac OS X 10.5.0 because the Firewall settings are not set correctly when the version is updated. Related Links • "Installing the Software" p.10 Installing EasyMP Network Projection (Windows) 11 Installing EasyMP Network Projection (Mac OS X) Install EasyMP Network Projection on your computer.
Setting Up the Projector Follow these instructions to select a connection method between a computer and the projector, and then set up the projector. Related Links • "Setting Up EasyMP Network Projection for the First Time" p.9 • "Connection Methods for Various Network Environments" p.12 • "Setting Up a Projector to Connect in Quick Connection Mode" p.14 • "Setting Up a Projector to Connect in Advanced Connection Mode (Wireless)" p.
Setting Up the Projector • To connect the projector to the computer using a wireless network system: Use Advanced Connection Mode. 13 • To connect the projector to the computer using a wired network system: Use Advanced Connection Mode. Related Links • "Setting Up the Projector" • "Setting Up a Projector to p.14 • "Setting Up a Projector to (Wireless)" p.14 • "Setting Up a Projector to (Wired)" p.15 p.
Setting Up the Projector Setting Up a Projector to Connect in Quick Connection Mode To connect a computer directly to the projector using wireless communication, you need to select network settings on the computer and the projector. a Select the necessary settings to connect your computer to a wireless LAN. See the documentation supplied with your computer for more details. b Install the wireless LAN unit in the projector, if necessary. See the User's Guide supplied with the projector for more details.
Setting Up the Projector c Install the wireless LAN unit in the projector, if necessary. See the User's Guide supplied with the projector for more details. d e Turn on the projector. f Select Wireless LAN. Press the Menu button on the remote control or the control panel, select the Network menu, and select Network Configuration. A screen like one of the following is displayed. 15 Related Links • "Setting Up the Projector" p.
Setting Up the Projector e Press the Menu button on the remote control or the control panel, select the Network menu, and select Network Configuration. f Select Wired LAN. g Select IP settings as necessary. A screen like one of the following is displayed. • DHCP is available: Turn on the DHCP setting. • DHCP is not available: Turn off DHCP and enter the projector's IP Address, Subnet Mask, and Gateway Address values as necessary.
Connecting to the Projector and Projecting Images Follow these instructions to connect the computer and the projector over a network, and to project images from your computer's screen using the projector. Make sure you have already set up EasyMP Network Projection and selected a connection mode for the projector. Related Links • • • • • • "Connection Methods" p.18 "Changing the Projector Search Method" p.24 "Controlling the Projected Display" p.31 "Finishing Projecting Images" p.
Connection Methods 18 You can select a suitable method to connect the computer and the projector over a network depending on your network environment. Related Links • "Connecting to the Projector and Projecting Images" p.17 • "Connecting the Projector and a Computer Directly Using Wireless Communication" p.18 • "Connecting the Projector and a Computer over a Network System (Wireless)" p.20 • "Connecting the Projector and a Computer over a Network System (Wired)" p.
Connection Methods 19 • Windows Vista, Windows 7, and Windows 8: Enter the keyword displayed on the LAN standby screen, and then click OK. When the following dialog box is displayed, enter the passphrase set on the projector, and then click Connect. The projector search results are displayed. d If the projector you want to connect to is not displayed in the search results, search for it using one of the following methods. • Automatic Search: Searches for the projector automatically.
Connection Methods 20 EB****** a When a connection is established, the input source for the projector automatically switches to the LAN source if no other signal is being input. If the input source does not automatically switch to the LAN source, press the LAN button. Related Links • • • • "Connection Methods" p.18 "Setting Up a Projector to Connect in Quick Connection Mode" p.14 "Searching for Network Projectors Automatically" p.
Connection Methods 21 When the connection is complete, the computer screen is projected. The following EasyMP Network Projection toolbar is displayed on the computer screen. a When a connection is established, the input source for the projector automatically switches to the LAN source if no other signal is being input. If the input source does not automatically switch to the LAN source, press the LAN button. Related Links The projector search results are displayed.
Connection Methods a a 22 Make sure you connect a computer to the network. Press the LAN button on the remote control. The LAN standby screen is projected. EB****** The projector search results are displayed. b Start EasyMP Network Projection. • Windows XP, Windows Vista, and Windows 7: Click Start, select Programs (or All Programs), EPSON Projector, EasyMP Network Projection, and then click EasyMP Network Projection Ver.X.XX. d • Automatic Search: Searches for the projector automatically.
Connection Methods When the connection is complete, the computer screen is projected. The following EasyMP Network Projection toolbar is displayed on the computer screen. a When a connection is established, the input source for the projector automatically switches to the LAN source if no other signal is being input. If the input source does not automatically switch to the LAN source, press the LAN button. Related Links • "Connection Methods" p.
Changing the Projector Search Method You can select a suitable method to search for a projector depending on the status or location of the projector you want to connect to. Related Links • • • • "Connecting to the Projector and Projecting Images" p.17 "Search Methods" p.24 "Searching for Network Projectors Automatically" p.24 "Searching for Network Projectors by Specifying an SSID, IP Address, or Projector Name" p.25 • "Searching for Network Projectors Using a Profile" p.
Changing the Projector Search Method Related Links • "Changing the Projector Search Method" p.24 • "Searching for Network Projectors by Specifying an SSID, IP Address, or Projector Name" p.25 • "Performing a Profile Search" p.26 • "Search Methods" p.24 25 b Specify one of the following items, and then click OK. • Quick Connection Mode: Select the SSID for the projector you want to connect to from the list.
Changing the Projector Search Method 26 Searching for Network Projectors Using a Profile You can save network projector information as a profile, and then specify the profile to search for the same projector instead of specifying the relevant details each time. Related Links • • • • • "Changing the Projector Search Method" p.24 "Profile" p.26 "Performing a Profile Search" p.26 "Making a Profile" p.27 "Managing a Profile" p.28 Profile You can save information for a network projector as a profile.
Changing the Projector Search Method Making a Profile After searching for a projector, you can save the projector details as a profile using a memorable name that you can search for easily later. a While the projector is displayed on the following screen, click Save in the profile. b Enter a Profile name, and then click Add. 27 c Perform the following operations as necessary.
Changing the Projector Search Method 28 • A folder selection screen is displayed: If you have created a folder for profiles, one of the following screens is displayed. After entering the Profile name and selecting the Save in destination, click Add. Windows: The projector information is saved in the profile. Related Links • "Searching for Network Projectors Using a Profile" p.26 Managing a Profile You can change the name and the organization of your profiles.
Changing the Projector Search Method 29 The Set options screen is displayed. b Click Edit profile. The Edit profile screen is displayed. c Edit the profiles as necessary.
Changing the Projector Search Method 30 d Click OK. Your edits are saved and the Edit profile screen closes. Related Links • "Searching for Network Projectors Using a Profile" p.26 A Displays the profiles. You can drag and drop profiles and folders to change the folder structure. B Duplicates the profile. The copied profile is saved in the same folder as the original with the same name. C Deletes the profile and the folder. D Displays the Rename dialog box to rename the folder or the profile.
Controlling the Projected Display 31 Follow these instructions to use the toolbar to control the screen being projected. • Stop: Click the button on the toolbar. The projected image stops. A black screen is projected while stopped. Related Links • "Connecting to the Projector and Projecting Images" p.17 • "Hiding Computer Operations" p.31 • "Switching the Input Source" p.31 • Pause: Click the button on the toolbar. The projected image pauses. The paused image is projected.
Controlling the Projected Display b c d 32 If you are connected to multiple projectors, click the button on the toolbar and select the projector you want to control. Click the button on the toolbar. Perform one of the following operations. • Switch to a computer source: Click the • Switch to a video source: Click the Related Links • "Controlling the Projected Display" p.31 button. button.
Finishing Projecting Images You can finish projecting images by using the toolbar. Click the button to disconnect. The computer and the projector are disconnected and the LAN standby screen is projected. The search and connect screen is displayed in EasyMP Network Projection software. Related Links • "Connecting to the Projector and Projecting Images" p.
Using Additional Functions Follow these instructions to use additional EasyMP Network Projection functions that may be useful during a meeting or presentation. Related Links • • • • • "Changing "Projecting "Projecting "Projecting "Projecting the Computer Projection Source" p.35 Only a PowerPoint Slide Show" p.36 Movies" p.37 Images Using the Multi-Screen Display Function" p.40 One Computer Screen from Multiple Projectors" p.
Changing the Computer Projection Source You can change the computer from which you are projecting which allows you to change presenters during meetings, for example. a If a connection is made while Disable interrupt connection is set on the search and connect screen, the connection is not switched to another computer. a Start EasyMP Network projection on the computer you want to project from. b Follow standard procedures to connect the projector and a computer.
Projecting Only a PowerPoint Slide Show 36 By using Presentation Mode, you can project only the PowerPoint slide show running on your computer. You can start presentation without displaying any other distracting computer content. While using Presentation Mode, a black screen is projected when the PowerPoint slide show is not playing. a To stop Presentation Mode, click the Related Links • "Using Additional Functions" p.34 Presentation Mode also works in Keynote with Mac OS X.
Projecting Movies 37 You can project movies smoothly by using Movie Sending Mode. Related Links You can send movie files directly to the projector by using Movie Sending Mode. This allows smoother play back of movies than by projecting them from another application on your computer. • "Using Additional Functions" p.34 • "Supported Movie Files" p.37 • "Using Movie Sending Mode" p.37 You can also select multiple files and play them repeatedly from first to last.
Projecting Movies c Select the projector, and then click OK. d Click Select File. 38 The Movie Sending Mode screen is displayed. The Movie Sending Mode screen is displayed again. The selected file is displayed in the Movie file list. If you click Select file again, the Movie file list currently displayed is cleared, and then only the files you select later are displayed in the list. f e Control movie play back using the Movie Sending Mode screen.
Projecting Movies B C D E F G Plays the file. Pauses play back. Stops play back. Plays the current file from the beginning. Plays the next file from the beginning. Plays repeatedly from the first file in the list. You cannot repeat one specific file when there are multiple files in the list. g To exit Movie Sending Mode, click Close. Related Links • "Projecting Movies" p.
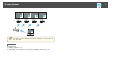
Projecting Images Using the Multi-Screen Display Function 40 By using the multi-screen display function, you can project different images from up to four projectors that are connected to one computer. This allows you to project complex data, such as a business report, in an extra-wide landscape format. Related Links • "Using Additional Functions" p.34 • "Multi-Screen Display Examples" p.40 • "Setting Up Multi-Screen Display" p.
Projecting Images Using the Multi-Screen Display Function 41 Related Links • • • • • "Projecting Images Using the Multi-Screen Display Function" p.40 "Enabling the Virtual Display Driver (Windows)" p.41 "Arranging the Multi-Screen Display (Windows)" p.42 "Arranging the Multi-Screen Display (Mac OS X)" p.45 "Projecting Images to the Arranged Multi-Screen Display" p.
Projecting Images Using the Multi-Screen Display Function 42 Related Links • "Setting Up Multi-Screen Display" p.41 Arranging the Multi-Screen Display (Windows) You can arrange the position of each display. If you are using a virtual display, enable the virtual display before arranging the multi-display. a b If you use an external display, connect it to the computer. Check the following items when connecting over a wireless LAN and modify the settings as necessary.
Projecting Images Using the Multi-Screen Display Function 43 Display layout and Display properties options are added at the bottom of the screen. f Click Display properties. The Display Properties screen is displayed.
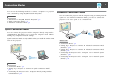
Projecting Images Using the Multi-Screen Display Function g 44 Click the Settings tab. a h Drag the displayed monitor icon and place it where you want the additional image to appear. In the following example, the actual monitor (1) is placed on the left, while the additional monitor (3) is placed on the right. • When the PC has multiple display output terminals, the numbers assigned to the virtual terminals are sequential to those of the physical terminals.
Projecting Images Using the Multi-Screen Display Function 45 a e i In Quick Connection Mode, you cannot connect to multiple projectors and project different images to each projectors. Select Use multi-display. Click OK to close the Display Properties screen. Related Links • "Setting Up Multi-Screen Display" p.41 Arranging the Multi-Screen Display (Mac OS X) You can arrange the position of each display. a b Connect an external monitor to the computer.
Projecting Images Using the Multi-Screen Display Function 46 The Display setting screen is displayed. f Click Display preferences. g Click Arrangement. h Clear Mirror Displays.
Projecting Images Using the Multi-Screen Display Function i j 47 Drag the displayed monitor icon and place it where you want the additional image to appear. c Select the projector and the number you want to assign from Display to set which image you want to project from which projector. d Click Connect. Close the Display setting screen. Related Links • "Setting Up Multi-Screen Display" p.
Projecting Images Using the Multi-Screen Display Function a e If you use a virtual display on Windows, you cannot view the image being sent to a virtual display on the computer. To adjust the image on the virtual display, check the projected image. To perform mouse-based operations on the virtual display, move the mouse pointer in the direction of the virtual display so that the pointer appears on the virtual display. To end projection for multi-screen display, click Disconnect on the toolbar.
Projecting One Computer Screen from Multiple Projectors You can project one computer screen from up to four projectors simultaneously. When you connect to the projectors in Quick Connection Mode, you need to set the same SSID for all of the projectors you want to connect to. a Start EasyMP Network Projection. • Windows XP, Windows Vista, and Windows 7: Click Start, select Programs (or All Programs), EPSON Projector, EasyMP Network Projection, and then click EasyMP Network Projection V2.XX.
Solving Problems See the following sections to check for solutions to problems you may have using EasyMP Network Projection. Related Links • • • • "Solving Network Connection Problems" p.51 "Solving Problems During Projection" p.55 "Error Messages List" p.57 "Event ID List" p.
Solving Network Connection Problems 51 Try these solutions depending on your network environment. • Check the projector's network settings. • Set the Connection Mode setting to Quick. Go to Network > Network Configuration > Wireless LAN > Connection Mode. Related Links • "Solving Problems" p.50 • "Solutions When You Cannot Connect Using Quick Connection Mode" p.51 • "Solutions When You Cannot Connect Using Advanced Connection Mode (Wireless)" p.
Solving Network Connection Problems Related Links • "Solving Network Connection Problems" p.51 • "Set options - General settings" p.68 • "Changing the Computer Projection Source" p.35 Solutions When You Cannot Connect Using Advanced Connection Mode (Wireless) When you cannot connect the computer and the projector using Advanced Connection Mode over a wireless network, try the following solutions.
Solving Network Connection Problems • Check the computer's network settings. • If the wireless LAN adapter is not installed on your computer, install a wireless LAN card on your computer. • Enable the wireless LAN setting or AirPort on your computer. • Connect to the access point to which the projector is connected. • Turn off the firewall. Or register the firewall as an exception. If you do not want to turn it off or register it as an exception, make the necessary settings to open the ports.
Solving Network Connection Problems • Check the computer's network settings. • Enable LAN settings on your computer. Windows: Check Control Panel > System > Hardware > Device Manager. • Turn off the firewall. If you do not want to turn it off, register the firewall as an exception. Make the necessary settings to open the ports. The ports used by this software are "3620", "3621", and "3629". • Check the access point settings.
Solving Problems During Projection Try these solutions depending on your situation. Related Links • "Solving Problems" p.50 • "Solutions When the Computer Screen is Not Displayed Properly" p.55 • "Solutions When the Screen is Not Projected Properly" p.55 • "Solutions When There is No Audio" p.56 Solutions When the Computer Screen is Not Displayed Properly If there are any problems with the computer screen, try the following solutions.
Solving Problems During Projection Solutions When There is No Audio If there is no audio coming from the projector, try the following solutions. • Audio can only be transferred to one projector. When mutliple projectors are connected to one computer, disconnect other projectors and try again. • Select Output audio from the projector on the Audio Output tab from Set options. Related Links • "Solving Problems During Projection" p.55 • "Set options - Audio Output" p.
Error Messages List When an error occurs, an error message is displayed on your computer screen. Check for your message and follow the instructions here to clear the error. Related Links • • • • 57 Error Messages Remedy Network adapter information could not be obtained. Check the following items. • A network adapter is installed on the computer. • The driver for the network adapter being used is installed on the computer. • The network adapter is enabled.
Error Messages List 58 Error Messages when Searching for and Selecting Projectors Error Messages Remedy Cannot connect to the projector using this version of EasyMP Network Connection. Install the latest version of EasyMP Network Projection. Install the current version of EasyMP Network Projection from the EPSON Projector Software CD-ROM supplied with the projector. You can download the latest version of EasyMP Network Projection from the Epson Web site.
Error Messages List Error Messages 59 Remedy You need to restart your computer to To transfer audio to the projector and enable Audio Output. Select Yes to play back, select Yes and restart the computer. restart now or select No to restart later. Related Links • "Error Messages List" p.
Event ID List 60 When a connection error occurs, a number indicating the type of error is displayed as follows. Event ID Cause Remedy Event ID: 04xx 0898 Failed to acquire DHCP. Check the DHCP server to see if it is operating correctly and check the LAN cable to see if it is connected correctly. If you are not using DHCP, turn off the DHCP setting.
Screen Summary See these sections for more information about the EasyMP Network Projection screens. Related Links • • • • • • • "Select Connection Mode Screen" p.62 "Search and Connect Screen" p.63 "Profiles" p.66 "Set options" p.68 "Toolbar" p.72 "Movie Sending Mode" p.75 "Add-Remove Virtual Display" p.
Select Connection Mode Screen When you start EasyMP Network Projection, the select connection mode screen is displayed. A Select the connection mode. B Select to always connect using the selected connection mode. Related Links • "Screen Summary" p.
Search and Connect Screen When you start EasyMP Network Projection and select a connection mode, one of the following screens is displayed depending on the connection mode you selected. 63 • When selecting Advanced Connection Mode • When selecting Quick Connection Mode A Automatic search B Manual search C Status In Quick Connection Mode, searches for the projectors based on the SSID.
Search and Connect Screen 64 Available. F Disable interrupt connection Select to prevent an interrupt connection by other computers while connected to the selected projector. Available. When you click Connect, the computer currently connected is disconnected and your computer is connected. G Use multi-display Select when using the multi-screen display function. When this is selected, Display layout and Display properties (Display preferences) are displayed at the bottom of the screen.
Search and Connect Screen Related Links • "Screen Summary" p.61 • "Searching for Network Projectors Automatically" p.24 • "Searching for Network Projectors by Specifying an SSID, IP Address, or Projector Name" p.25 • "Making a Profile" p.27 • "Performing a Profile Search" p.26 • "Projecting Images Using the Multi-Screen Display Function" p.40 • "Set options" p.
Profiles See these sections for more information about the screens for saving and managing profiles. 66 • If you have created a folder for profiles. Related Links • "Screen Summary" p.61 • "Save in the profile" p.66 • "Edit profile" p.66 Save in the profile When you search for projectors and click Save in the profile on the search and connect screen, one of the following screens is displayed. • If no folder has been created. A Profile name Enter the profile name.
Profiles 67 SSID or IP address Delete Deletes the selected projector from the profile. When all projector information is deleted, the profile is also deleted. Related Links • "Profiles" p.66 • "Making a Profile" p.27 A Profile Displays the profile. You can drag and drop profiles and folders to change the folder structure. B Copy Duplicates the profile. The copied profile is saved in the same folder as the original with the same name. C Delete Deletes the profile and the folder.
Set options 68 When you click Set options on the EasyMP Network Projection search and connect screen, the Set options screen is displayed. You can make option settings such as the processing method when EasyMP Network Projection starts. a You can also access Set options by clicking the button on the toolbar. When you access Set options from the toolbar, the General settings tab is not displayed. Related Links • • • • "Screen Summary" p.61 "Set options - General settings" p.
Set options 69 Make the movement of the mouse pointer smooth Windows XP/Windows Vista/Windows 7 only Select to prevent the mouse pointer from flickering when Transfer layered window is selected in Adjust performance. (If Windows Aero is selected as the theme for Windows Vista and Windows 7, this setting turns off Windows Aero.) Use Interactive Pen Select to use the interactive function over a network (supported models only). You do not need to connect a computer to the projector with a USB cable.
Set options 70 Transfer layered window Windows XP only When using a layered window, contents such as messages displayed on the computer are not projected by the projector. Select this to project contents such as messages that use the layered window. If the mouse pointer flickers on the screen, select Make the movement of the mouse pointer smooth in General settings.
Set options 71 Related Links • "Set options" p.68 Output audio from the projector Select to output the computer's audio from the projector. Clear to output audio from the computer. However, when playing movies with audio in Movie Sending Mode, audio is always output from the projector regardless of this setting. a Restore Defaults Audio can only be transferred to one projector. Audio cannot be transferred when connected to multiple projectors.
Toolbar 72 After EasyMP Network Projection starts and a connection is made with the projector, the toolbar is displayed on the computer screen. You can use this toolbar to operate and make settings for the projector, and to disconnect the network connection. Screen Preview Set options Displays the multi-screen preview screen. Click to display a preview with the settings you have made. Click each display to enlarge each Screen Preview to fullscreen. Displays the Set options screen.
Toolbar 73 During the Presentation Mode. Select target projector When you click the During the Movie Sending Mode. button on the toolbar, the following screen is displayed. Related Links • • • • • "Toolbar" p.72 "Search and Connect Screen" p.63 "Hiding Computer Operations" p.31 "Projecting Only a PowerPoint Slide Show" p.36 "Projecting Movies" p.37 Projector control A – Select the projector you want to control. When you click the B No. Indicates the number assigned to the projector.
Toolbar 74 Changes to images from the video input port. Switch video source Related Links • "Toolbar" p.72 • "Hiding Computer Operations" p.31 • "Switching the Input Source" p.
Movie Sending Mode When you click the button on the toolbar and select a projector, the 75 H following screen is displayed. Plays repeatedly from the first file in the list. You cannot repeat one specific file if there are multiple files in the list. Related Links • "Screen Summary" p.61 • "Projecting Movies" p.37 A Movie file list Displays a list of selected movie files. B — Displays the current point in the movie file.
Add-Remove Virtual Display During installation and startup of EasyMP Network Projection on Windows, the Add-Remove Virtual Display screen is displayed. A Virtual Display 1 to 4 Select the virtual display you want to use for the multiscreen display function. You can select up to four monitors. Related Links • "Screen Summary" p.61 • "Enabling the Virtual Display Driver (Windows)" p.
Appendix See these sections to learn more about EasyMP Network Projection software. Related Links • • • • "Updating and Uninstalling the Software" p.78 "Supported Resolutions and Colors" p.80 "Limitations" p.81 "Notices" p.
Updating and Uninstalling the Software Follow these instructions to update or uninstall EasyMP Network Projection. Related Links • "Appendix" p.77 • "Getting the Latest Version of the Application" p.78 • "Uninstalling EasyMP Network Projection (Windows XP/Windows Vista/ Windows 7)" p.78 • "Uninstalling EasyMP Network Projection (Windows 8)" p.78 • "Uninstalling EasyMP Network Projection (Mac OS X)" p.79 Getting the Latest Version of the Application 78 b c d Click Start, and then click Control Panel.
Updating and Uninstalling the Software b c d e f Make sure all running applications are closed. Select Search on the Charms, and then right-click (press and hold) EasyMP Network Projection Ver.X.XX. Select Uninstall from the app bar. Select EasyMP Network Projection, and then select Uninstall. Follow the on-screen instructions. Related Links • "Updating and Uninstalling the Software" p.
Supported Resolutions and Colors Check these sections for the computer screen resolutions and the number of colors that EasyMP Network Projection can project. 80 Related Links • "Supported Resolutions and Colors" p.80 Related Links • "Appendix" p.77 • "Supported Resolutions" p.80 • "Display Color" p.80 Supported Resolutions The following computer screen resolutions can be projected with EasyMP Network Projection. You cannot connect to a computer with a resolution greater than WUXGA.
Limitations Check these sections for restrictions applied when projecting computer images while running EasyMP Network Projection. Related Links • "Appendix" p.77 • "Connection Limitations" p.81 • "Limitations when Projecting from Windows Photo Gallery or Windows Live Photo Gallery" p.81 • "Limitations in Windows Aero" p.81 • "Limitations when Projecting from Windows Media Center" p.82 81 • Slideshow is played back in simple mode when projecting from Windows Photo Gallery or Windows Live Photo Gallery.
Limitations • A few minutes after you connect a computer to the projector over a network with EasyMP Network Projection, the following message may be displayed. It is recommended that you select Keep the current color scheme, and don't show this message again. This selection is enabled until the computer is restarted. Related Links • "Limitations" p.81 Limitations when Projecting from Windows Media Center You cannot project images in full screen display using Windows Media Center.
Notices Check these sections for important notices about your projector. Related Links • • • • "Appendix" p.77 "Copyright Notice" p.83 "About Notations" p.83 "General Notice" p.83 Copyright Notice All rights reserved. No part of this publication may be reproduced, stored in a retrieval system, or transmitted in any form or by any means, electronic, mechanical, photocopying, recording, or otherwise, without the prior written permission of Seiko Epson Corporation.
Notices Microsoft, Windows, Windows NT, Windows Vista, PowerPoint, and Windows logo are trademarks or registered trademarks of Microsoft Corporation in the United States and/or other countries. Other product names used herein are also for identification purposes only and may be trademarks of their respective owners. Epson disclaims any and all rights in those marks. Software Copyright: This product uses free software as well as software to which this company holds the rights.