EasyMP Multi PC Projection Operation Guide
Contents 2 About EasyMP Multi PC Projection Meeting Styles Proposed by EasyMP Multi PC Projection . . . . . . . 5 Holding Meetings Using Multiple Images . . . . . . . . . . . . . . . . . . . . . . . . . . . . . . 5 Holding Remote Meetings Over a Network . . . . . . . . . . . . . . . . . . . . . . . . . . . . . 5 Installing the Software . . . . . . . . . . . . . . . . . . . . . . . . . . . . . . . . . . . . . . 6 Software Requirements . . . . . . . . . . . . . . . . . . . . . . . . . . . . . . . . . . . .
Contents 3 The movie image and audio are not displayed, the image is slow to appear, or either the video or audio stop when projecting using EasyMP Multi PC Projection .... .. ...... ..... ..... .. ...... ..... ...... .. ..... ...... .. No audio from the projector when connecting with EasyMP Multi PC Projection .... .. ...... ..... ..... .. ...... ..... ...... .. ..... ...... .. When a connection is made using EasyMP Multi PC Projection, a PowerPoint Slide Show cannot be started. . . . . . . . . . . . . .
About EasyMP Multi PC Projection This chapter introduces the meeting styles you can use with EasyMP Multi PC Projection, and explains how to install the software.
Meeting Styles Proposed by EasyMP Multi PC Projection 5 By using EasyMP Multi PC Projection, you can use the projectors to hold interactive meetings. into the projection area. Making these changes allows presenters to clearly express their opinions along with the images. You can connect up to 16 computers to one projector via a network. You can then select up to four of these connected computers and project their screens.
Installing the Software You can find EasyMP Multi PC Projection on the EPSON Projector Software CD-ROM. Install the software on the computer you are using. Software Requirements 6 Amount of Memory 256 MB or more Recommended: 512 MB or more Hard Disk Space 20 MB or more Display Resolutions greater than XGA (1024x768), or less than UXGA (1600x1200) Display color: 16 bit color (display color approx. 32,000 colors) EasyMP Multi PC Projection runs on computers that meet the following requirements.
Installing the Software d Follow the on-screen instructions to install. For Mac OS a b c d Turn on your computer. Insert the EPSON Projector Software CD-ROM into your computer. Double-click the Install Navi icon in the EPSON window. Follow the on-screen instructions to install. a You can download the latest version of EasyMP Multi PC Projection from the following Web site. http://www.epson.
Operation Summary This chapter explains the basic procedures for using EasyMP Multi PC Projection in a meeting.
Operating Procedures a 9 Install EasyMP Multi PC Projection. s p.6 Follow the on-screen instructions to install. b Start EasyMP Multi PC Projection. s p.15 For Windows Start - All Programs - EPSON Projector - EasyMP Multi PC Projection - EasyMP Multi PC Projection Ver. x.
Operating Procedures c 10 Connect to the projectors. s p.17 Select Automatic search to search for the projectors. Select the projectors you want to connect to, and then click Join. a • You can search for the projectors using three different methods; Automatic search, Manual search, and Profile. See the following for more details on each search method. s "Using the Search Screen" p.
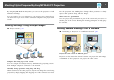
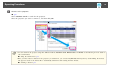
Operating Procedures d 11 Project screens. s p.22 On the projection control screen, the projection area is divided into four panels. You can change the number of available panels and change which computer's screens are projected. A D C B The computer's screen for the first user to connect is projected in the top left panel. Users who connect later can project by dragging and dropping the user's icons into the available (white) panels.
Operating Procedures e End the meeting. s p.25 Select Leave or End Session from the Tool menu to stop projecting. When you select Leave or End Session, you are returned to the search screen. a Leave The connection between your computer and the projectors is cut. End Session The connection between all computers and projectors participating in the session is cut.
Preparations Before Starting a Meeting This chapter explains the settings you need to make before starting a meeting.
Preparing to Connect Preparing Your Projector Follow the steps below to put the projector into connection standby status. When connecting via wired LAN, check that the projector is connected to the network with a commercially available network cable. When connecting via wireless LAN, install the wireless LAN unit in the projector. a b a Install EasyMP Multi PC Projection on the computer. b Make the computer's network settings, and connect the computer to the network.
Connecting to the Projectors This section explains how to search for and connect to the projectors on the network. Starting EasyMP Multi PC Projection Start EasyMP Multi PC Projection using one of the following methods. For Windows a b c Click Start, and then select All Programs. Select EPSON Projector, and then EasyMP Multi PC Projection. Click EasyMP Multi PC Projection Ver. x.xx. EasyMP Multi PC Projection starts, and the search screen is displayed.
Connecting to the Projectors 16 D Profile list Displays the registered profiles (projector information). When you double-click the profile, the projectors registered in the profile is searched for on the network. s "Profile search" p.18 L K E Set options Displays the Set options screen. s "Set Options" p.40 J F Join Connects to the selected projectors. G List of Connected Projectors Displays information on the projectors selected from the Projector List.
Connecting to the Projectors Mirroring... Available. You can connect to a group of multiple projectors projecting the same image (mirroring). s "Connecting to Multiple Projectors (Mirroring)" p.19 17 b Click Automatic search. Not available. The projector is displaying the Currently in use by another network configuration screen, or the projector is being used by other projector software. application Searching Not available.
Connecting to the Projectors 18 Manual search a Start EasyMP Multi PC Projection. b c Click Manual search. a s "Starting EasyMP Multi PC Projection" p.15 Enter the IP address or the projector name for the projector you want to connect to, and then click Search. When a projector keyword has been set, the keyword entry screen is displayed when you connect to the projector. Enter the keyword, and then click OK. The projector keyword is displayed on the LAN standby screen.
Connecting to the Projectors d 19 Select the projectors you want to connect to from the list displayed, and then click Join. The projection control screen is displayed. s "Using the Projection Control Screen" p.22 a When a projector keyword has been set, the keyword entry screen is displayed when you connect to the projector. Enter the keyword, and then click OK. The projector keyword is displayed on the LAN standby screen. If a user is already connected, check the keyword with the connected user.
Connecting to the Projectors Connecting to Projectors on a Different Network By connecting the projectors to a computer, you can project the computer's screen at remote locations (on different subnets). In Automatic search, projectors on different subnets are not found because searches are only performed in the same subnet. You can connect to projectors on a different subnet using one of the following methods. • Specify either an IP address or projector name and perform a search. s "Manual search" p.
Operations During a Meeting This chapter explains how to control the screen being projected during a meeting.
Project Screens 22 B Using the Projection Control Screen When you connect to projectors, the following screen is displayed. Screen control buttons Control the image projected from your computer's screen. Project the computer's screen as it is. Stop projecting. Projects a black screen while it is stopped. A E Pause the computer's screen currently being displayed. The projected screen does not change, even if you make changes on the computer's screen.
Project Screens a 23 When you click the projector name next to Connected Projector Name, Web Remote is displayed. In Web Remote, you can make projector operations on your computer's screen in the same way as using the remote control. See the following manual for more details on Web Remote. Changing the Presenter When changing the projection screen Drag and drop an icon in the user's area to the panel you want to project.
Project Screens a When 24 or are selected, you can change the computer's screen being projected by switching the icon being projected (the icon in the white panel) with an icon not being projected (the icon in the black panel). Outputting Audio from the Projector You can output the computer's audio from the projector when one computer is connected to one projector and is projecting in full screen.
Ending the Meeting When you want to end a session, use one of the following methods to disconnect from the projectors. When only you disconnect Right-click your icon in the user's area, and then select Leave. a You can also disconnect by selecting Leave from the Tool menu. When ending the session Select End Session from the Tool menu. All computers and projectors participating in the session are disconnected.
Holding Frequent Meetings with Ease This chapter explains how to save and organize projector information used during a meeting allowing you to hold subsequent meetings with ease.
Saving Projector Information By saving the projector information used during the first meeting, you can participate smoothly in subsequent meetings when they are held in the same environment. You can save projector information by creating a shortcut or registering the information to a profile. 27 You can register a profile by using one of the following methods.
Saving Projector Information 28 a In the profile list, right-click the folder containing the profile you want to share, and then select Export. b Select where you want to save the profile (.mplist), and then save the profile. Importing the shared profile Follow the steps below to import the shared profile to EasyMP Multi PC Projection. a • To register a projector, you can drag and drop the projector you want to register from the projector list to the Profile list folder.
Troubleshooting This chapter identifies possible problems and explains how to handle them.
Limitations 30 When projecting computer images while running EasyMP Multi PC Projection, the following restrictions apply. Number of Connections You can connect up to four projectors to one computer and project simultaneously. (Multi-screen is not supported.) Supported Resolutions You can connect up to 16 computers to one projector at the same time. The following computer screen resolutions can be projected. You cannot connect to a computer with a resolution greater than UXGA.
Limitations Limitations when projecting from Windows Photo Gallery or Windows Live Photo Gallery Note the following two limitations when launching Windows Photo Gallery or Windows Live Photo Gallery when EasyMP Multi PC Projection is running. 31 • A few minutes after you connect a computer to the projector over a network with EasyMP Multi PC Projection, the following message may be displayed. It is recommended that you select Keep the current color scheme, and don't show this message again.
Solving Problems 32 Cannot connect to the projector you want to use Cannot connect the projector and the computer via wireless LAN Check Is the Wireless LAN unit connected? Remedy Check that the Wireless LAN unit is securely connected. Is the projector connection mode set to Quick connection mode? EasyMP Multi PC Projection cannot connect using Quick connection mode. Set the connection mode to Advanced connection mode.
Solving Problems 33 Check Remedy Are connection denial functions, such as MAC Address Set the projector to allow connections from the access point. restrictions and port restrictions, set correctly at the access point? Are the IP address, the subnet mask, and the gateway address for the access point and the projector set correctly? When not using a DHCP, adjust each setting.
Solving Problems 34 The Screen is not Projected The movie image and audio are not displayed, the image is slow to appear, or either the video or audio stop when projecting using EasyMP Multi PC Projection Check Remedy Did you try to play back movies with Media Player or try to operate Depending on the computer, the movie playback screen in Media Player may not be displayed, and the screen saver the screen saver preview? preview may not be displayed normally.
Solving Problems 35 When a connection is made using EasyMP Multi PC Projection, a PowerPoint Slide Show cannot be started. Check Remedy Was EasyMP Multi PC Projection started while PowerPoint was running? (For Windows) When connecting with EasyMP Multi PC Projection, make sure you close PowerPoint first. Slide Show might not run if connecting while PowerPoint is running. When a connection has been made using EasyMP Multi PC Projection, the screen will not be refreshed when using an Office application.
Error Message List 36 Error Messages when Starting up EasyMP Multi PC Projection Error Messages Remedy This application is already running. Two instances of EasyMP Multi PC Projection have been started. Cannot start this application because other EPSON Projector software (Quick Wireless Connection) is already running. Close the other projector software and then start EasyMP Multi PC Projection. Cannot start this application because other EPSON Projector software (USB Display) is already running.
Error Message List 37 Error Messages when Searching for and Selecting Projectors Error Messages Cannot join. The maximum number of participants has been exceeded. Remedy Sixteen computers are already connected to the projector. Disconnect users and projectors that are not projecting screens. s "Ending the Meeting" p.25 The keyword does not match. Re-enter the keyword displayed on Check the Projector Keyword displayed on the LAN standby screen, and enter the Projector Keyword.
Error Message List 38 Error Message when Operating a Profile Error Messages Remedy Enter max. 32 characters. The entered text exceeds 32 characters. Shorten the name to 32 characters or less. Enter a folder name. No folder name entered. Enter a folder name. Folders should not be created more than 6 layers deep. The folder structure is deeper than six folders. Create the new folder higher up in the folder structure. There is already a folder named XXX in this folder.
Appendix
Set Options You can display the Set options screen by using one of the following methods. • Click Set options on the search screen. 40 a If you display the Set options screen from the projection control screen, neither the User Settings tab or the General settings tab are displayed. User Settings Tab • Select Set options from the Tool menu on the projection control screen. User name Set the user name displayed in the user's area. You can enter up to 32 characters.
Set Options 41 General Settings Tab Adjust Performance Tab Encrypt communications Select to encrypt and transmit data. Even if data is intercepted, it cannot be decrypted. Performance adjustment slider The performance can be set to Fast, Normal, and Fine. Set to Fast when movie projections are interrupted. Switch LAN Windows only This is used to switch the network adapter to be used for a search when a computer has multiple adapters.
Set Options 42 Audio Output Tab Output audio from the projector Select to output the computer's audio from the projector. Clear to output audio from the computer. You can only output the computer's audio from the projector when projecting one computer's screen at full screen. Restore Defaults You can reset all adjustment values for Set options to their default settings. However, you can retain the setting for Switch LAN in General settings.
Uninstalling the Software Uninstalling Make sure you check the following points before starting uninstallation. • For Windows, you need administrator authority to uninstall EasyMP Multi PC Projection. • Close all running applications before starting uninstallation. For Windows XP a b c Click Start, and then Control Panel. Double-click Add/Remove Programs. Select EasyMP Multi PC Projection, and then click Remove. For Windows Vista/Windows 7 a b c Click Start, and then Control Panel.
General Notes All rights reserved. No part of this publication may be reproduced, stored in a retrieval system, or transmitted in any form or by any means, electronic, mechanical, photocopying, recording, or otherwise, without the prior written permission of Seiko Epson Corporation. No patent liability is assumed with respect to the use of the information contained herein. Neither is any liability assumed for damages resulting from the use of the information contained herein.
Index 45 A O Automatic search ......................................... 17 One screen .................................................... 22 Operating procedures ................................... 8 Output audio from the projector ........ 24, 42 C Change projection buttons ......................... 22 Connect ......................................................... 17 P 41 25 36 25 28 R F Registering a profile .................................... 27 Four screens ..............................