LOGOS IMAGING EPIX Scanner USB DIGITAL IMAGING SYSTEM U.S.
INTRODUCTION EPIX Digital Imaging System by LOGOS IMAGING SUPPLIES AND REPLACEMENT PARTS Congratulations on your purchase of the EPIX Digital Imaging System. The EPIX Digital Imaging System is a revolutionary new product designed to replace traditional x-ray film and film processors. To order supplies or replacement parts for your EPIX Digital Ima ging System, call your Logos Imaging equipment dealer. If your dealer is unable to assist you, call Logos Imaging.
TABLE OF CONTENTS Section 1: Use .............................................................................................................................. 3 Section 2: Safety Requirements ................................................................................................. 4 2.1. 2.2. IMPORTANT INFORMATION..........................................................................................4 WARNINGS AND CAUTION STATEMENTS................................................................
SECTION 1: USE The EPIX Digital Imaging System is intended for use as a general radiography system using x-ray recording media (phosphor imaging plates) for radiographic analysis providing interactive CRT retrieval, viewing and processing of stored computed radiographic images. The system includes reusable photostimulatable phosphor imaging plates, a laser diode scanner device and optical reader components, communications electronics and software, a workstation and various peripheral accessories.
SECTION 2: SAFETY REQUIREMENTS 2.1. IMPORTANT INFORMATION It is important that all personnel who will operate the EPIX Digital Imaging System read and understand this manual before operating the device. All personnel should follow all warnings and precautions as outlined in Section 2.2, for their safety and the safety of others around them. 2.2.
CAUTION STATEMENTS Completely erase the imaging plates. Before reusing an imaging plate, lay it blue or white surface up facing a bright light source for two (2) minutes as described in Section 5.2. Mount the imaging plates under low light conditions. Mount the imaging plates to the carousel under low light cond itions as described in Section 5.4. Exposure to direct sunlight or direct indoor lighting will erase the information stored on the imaging plate.
SECTION 3: PRE-INSTALLATION INFORMATION AND RECOMMENDATIONS 3.1. PURPOSE OF THE MANUAL The instructions contained in this manual should be carefully followed for safe, trouble- free and effective equipment use. This manual provides the essential information necessary for the installation, operation and routine care of the EPIX Digital Imaging System. This manual is not to be used as a replacement for training in radiography. 3.2.
3.3.
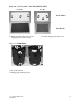
EPIX SCANNER LASER SCANNER Figure 3-1 Scanner Front View • Carousel well and lid. The carousel, with imaging plates attached, is inserted into the carousel well for scanning. The carousel lid must be in the closed position prior to scanning. The scanner will not operate with the lid open. ‚ LED indicator lights with graphic symbols. The lights show the current status of the system.
Figure 3-4 8 x 17 in. and 8 x 10 in.
3.4. COMPUTER REQUIREMENTS* Minimum Computer Requirements Recommended CPU Speed Operating system RAM Hard Drive CD ROM Drive USB port Display Backup Device Printer Recommended 1.0 GHz or higher Windows 2000 and Windows XP operating systems 256 MB 6 GB 4X 24X Required 24-bit display (minimum 800x600 resolution) Highly recommended (see appendix C) *See also the Imaging Software computer requirements. 3.5.
SECTION 4: INSTALLATION 4.1. SITE SELECTION The EPIX SCANNER can be located almost anywhere the operating conditions are met. The site you pick should have: œ Subdued lighting conditions. You should have the ability to turn down/off the lights and block sunlight with blinds. The area to be used for mounting imaging plates should not exceed 20 lux as measured on a light meter. This will give you about one minute to mount all of your imaging plates without encountering excess signal fading.
4.2. UNPACKING THE UNIT The EPIX Digital Imaging System is shipped in two boxes. Completely unpack the boxes and save them in a safe, dry location. You may need to repack the unit for shipping if you ever encounter a maintenance outage, or relocate your office. Fig. 4-1 Scanner, 1 each Fig. 4-5 Power Cord, 1 each Logos Imaging EPIX Scanner User Manual Fig.
4.3. LOADING THE EPIX DRIVER SOFTWARE Do not plug in or turn on the EPIX scanner before installing the Logos Imaging software. The EPIX system drivers are loaded automatically during Logos Software installation. WARNING: THE EPIX SYSTEM MUST NOT BE INSTALLED ON THE NETWORK SERVER 4.4. HARDWARE SETUP AND CONNECTIONS Before you start the hardware setup, ensure that you have an acceptable computer as outlined in Section 3.4. The computer must have a USB port available.
SECTION 5: SYSTEM OPERATING INSTRUCTIONS 5.1. PREPARING YOUR CURRENT X-RAY EQUIPMENT The EPIX Digital Imaging System produces x-ray images of high quality and low noise. More details on how this technology works can be found in appendix A. Almost any xray unit can be used with the EPIX system. There is no need to purchase a new one. The imaging plates can produce an excellent image over a wide range of exposures.
5.3. TAKING AN X-RAY Fig. 5-1 Ensure the computer, monitor and EPIX SCANNER are switched on and properly connected. The green LED indicates that the system is ready to scan Fig. 5-2 Launch your imaging software. Refer to your Imaging Software User Manual for details Fig. 5-3 Place the erased 8 x 10 in or 8 x 17 in imaging plate into a screen holder or protective sleeve with the white side pointed toward the X-ray machine.
5.4. SCANNING THE IMAGING PLATE Fig. 5-7 Once the scanner has been loaded, click on the EPIX Image button on the Logos Imaging Image Library toolbar. The software will automatically sense whether an 8 x 10 or 8 x 17 carousel is loaded. Fig. 5-8 When the scan is complete, the image thumbnail will appear in the Image Library window. If an error occurs during the scan or if the carousel lid is opened during the scan, the scanner will stop. Follow the troubleshooting guidelines to start scanning again.
SECTION 6: SOFTWARE OPERATING INSTRUCTIONS Logos Imaging software can capture digital x-ray images from the EPIX systems. Please refer to the Logos Imaging software user’s manual or online help file for detailed instructions.
SECTION 7: MAINTENANCE PROCEDURES The EPIX Digital Imaging System is designed for many years of trouble-free operation. It is manufactured from the highest quality components to ensure excellent performance. Maintenance that can be performed by the operator is minimal. 7.1. CLEANING THE SYSTEM Cleaning the Scanner Turn off the EPIX SCANNER, as described in Section 5.5, before cleaning.
7.2. OPERATOR MAINTENANCE Scanner Maintenance The only operator serviceable part of the EPIX SCANNER is the fuse. If you experience any other maintenance problem, contact your local Logos Imaging dealer. Follow these directions to change the fuse. Fig. 7-2 Turn the EPIX SCANNER off as per Section 5.5. Unplug the power cord and USB cable. WARNING: To avoid possible electrical shock, ensure that the power cord is unplugged. Fig.
7.3. TROUBLESHOOTING TROUBLE No power No green light PROBABLE CAUSE Scanner not plugged in Blown fuse Main power switch or power supply is bad Outlet does not have power Red, Green and/or Yellow LED(s) do not work; system operates normally The Scanner does not initialize when the software is opened After scanning, no image appears on the monitor Defective LED The scanner has not been turned on The lid on the carousel well is open The USB cable between the scanner and computer is loose or defective.
TROUBLE Image is too dark PROBABLE CAUSE Imaging plate has been overexposed Image contains ghost images or shadows. Imaging plate was not completely erased. Imaging plate was exposed with the back of the IP facing the X-ray machine You may notice the writing from the back of the plate on the image. Imaging plates have been stored in protective envelopes for too long a period. Partial erasure of the image due to exposure to light during handling of the imaging plates. Image shows artifacts.
7.4. DISPOSAL OF WASTE MATERIALS AND INOPERARTIVE PARTS Disposal regulations vary from country to country. Therefore, it is difficult to give specific instructions on the disposal of EPIX SCANNER waste materials and inoperative parts. In general, we believe the following guidelines to be true. Material Items Plastic Carousel Latches No Dispose of with other non-recyclable plastic items. Aluminum Housing, Optic Module Yes Remove all non-aluminum parts before recycling.
SECTION 8: STORAGE AND SHIPMENT 8.1. STORAGE The EPIX Digital Imaging System has been designed for long-term operation in a normal office environment. The system must be protected from adverse conditions such as excessive moisture, cold or heat. If the system is to be stored for a long period of time, pack the unit in its original carton. While in storage, keep at moderate temperatures and protect against moisture and humidity.
SECTION 9: TECHNICAL SPECIFICATIONS 9.1. SPECIFICATIONS EPIX Scanner Height Width Depth Weight (empty) Interface Cables Voltage Frequency Power Laser Classification Storage and Shipping Conditions 39.4 cm 15.5 in 49.3 cm 19.4 in 27.4 cm 10.8 in 15 kg 32 lbs USB cables 100-240 V AC 50/60 Hz 100 watts max. Compliance per DHHS Radiation Performance Standards 21 CFR, Ch I, Subch.
SECTION 10: WARRANTY STATEMENT EPIX Scanner The scanner and carousels are warranted against defects arising from faulty materials or workmanship for one (1) year from date of purchase. Parts will be repaired or replaced at our option. The EPIX Scanner and Carousels must be installed and operated in accordance with the Logos Imaging written instructions furnished with the unit. Please fill out the warranty registration card (appendix D) and mail to Logos Imaging as instructed.
Appendix A: Storage Phosphor Technology The EPIX SCANNER Digital Imaging System produces high quality x-ray images at very low doses. The imaging plates in the EPIX SCANNER system are much more efficient at capturing x-ray energy than x-ray film.
Appendix B: Lighting Conditions for Handling or Erasing Imaging Plates Without light, storage phosphor imaging would not work. The red light from the laser scanner excites the exposed imaging plates, causing them to emit blue light. After your computer interprets the blue light and changes it into a digital image, light is used to erase the residual information from the imaging plate. Between x-ray exposure and scanning, however, one must be careful handling the imaging plates.
Recommendations on Lighting Conditions for Erasing Imaging Plates In order to completely erase imaging plates, 99.5% of the image information must be removed. Scanning only removes part of the information. To completely erase imaging plates, follow the guidelines given below. It is important that you measure the light intensity with a light meter at the point where the imaging plate will be positioned. The intensity of light changes dramatically as you move away from the source.
Appendix C: Optional Printer Because the EPIX SCANNER system can be interfaced with different applications software, and printer technology is constantly evolving, we can only suggest a list of suitable technical requirements for printers. œ To interface with the PC, the printer must have a digital input and not a video (analog) input. Inkjet printers Black and white or color hard copy. Printers should have a minimum of 600 dpi resolution and pseudo-randomic dithering.
Appendix D: Warranty Registration It is important that you register your new EPIX SCANNER Digital Imaging System with Logos Imaging, so that we will be able to inform you directly of any changes or upgrades to the system. As with any software product, there will be continuous improvements to imaging software, and you may be interested in some of the upgrades. Registering your system with Logos Imaging ensures that you will be promptly notified of any new offerings.