Interactive Unit User's Guide
Important Safety Instructions • Make sure you read the Quick Setup Guide and follow the instructions in this document to install the Interactive Unit. • Keep the Quick Setup Guide for future reference. Explanation of Symbols Warning This symbol indicates information that, if ignored, could possibly result in personal injury or even death due to incorrect handling.
Installation Precautions Warning • Installation of the product on the wall should be performed by qualified technicians using only approved mounting equipment. • Incomplete or incorrect installation could cause the product to fall and cause personal injury or property damage. • If you apply adhesives to prevent the screws from loosening, or if you use lubricants or oils on the wall plate, the housing may crack and cause the product to fall, resulting in personal injury or property damage.
Usage Precautions Warning • Water infiltration or deterioration and breakage of the product housing could result in electric shock. • Never open any covers on the product except as specifically explained in this User's Guide. Never attempt to disassemble or modify the product (including consumables). Refer all repairs to qualified service personnel. Electrical voltages inside the product can cause severe injury.
Battery Precautions Warning • If liquid leaking from the batteries gets into your eyes, do not rub your eyes. Wash them immediately with clean water and consult a doctor. • Do not leave the batteries or the Easy Interactive Pen inside a vehicle with the windows closed, in places where they will be exposed to direct sunlight, or in places that may become extremely hot. Thermal deformation or technical malfunction may occur, which could result in fire. • Keep batteries out of the reach of children.
Contents Important Safety Instructions . . . . . . . . . . . . . . . . . . . . . . . . 2 6 Solving Problems Problems and Solutions . . . . . . . . . . . . . . . . . . . . . . . . . . . . . . . . . . . . 20 Introduction Product Features . . . . . . . . . . . . . . . . . . . . . . . . . . . . . . . . . . . . . . . . . . . 8 Included Items . . . . . . . . . . . . . . . . . . . . . . . . . . . . . . . . . . . . . . . . . . . . . . . . 8 Parts Location . . . . . . . . . . . . . . . . . . . . . . . . . . . .
Introduction The Interactive Unit is a wall-mounted receiver that works with your projector to turn virtually any surface into an interactive whiteboard. You can use it with your existing ceiling-mounted projector and standard whiteboard. The Interactive Unit includes all the hardware and software you need to create interactive presentations using your computer and installed projector.
Product Features 8 • Lightweight and easy to install • Includes wall plates and mounting hardware • Includes the Easy Interactive Driver software for using the pens with your computer • Includes two battery-operated pens that work with most Windows and Macintosh computers a You can also download the optional Easy Interactive Tools from the Epson website at http://www.epson.com.
Parts Location 9 Interactive Unit Name Easy Interactive Pen Function A Easy Interactive Function receiver Receives signals from the Easy Interactive Pen. B Wall plate cover Covers the connection between the Interactive Unit and the wall plate. C Wall plate Use this to mount the Interactive Unit. This illustration shows the long wall plate. Name Function A Battery indicator light When you press the button, the light turns green if there is any remaining battery power.
Parts Location 10 Pen Tray Name Function A Fixing points Attach the pen tray to a whiteboard or wall. B Security hole Pass a commercially available lock through here. a It is recommended that the pen tray be tightened with two commercially available M5 bolts.
Getting Started Before you can use your Interactive Unit, you need to install the software and connect the cables to your computer.
Installing the Software 12 This section explains how to install the software for the pens. Even if you already have interactive whiteboard software, you must install the Easy Interactive Driver from the CD labeled "Epson Projector Software for Easy Interactive Function." a Insert the CD labeled "Epson Projector Software for Easy Interactive Function" in your computer. Windows If you see the AutoPlay window, click Run EIDriverVxxx_Setup.exe.
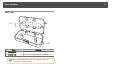
Installing the Pen Batteries Before you can use the pen, you need to install the batteries. To check the batteries, press the button on the pen. If the indicator light is green, the batteries have enough power. s p.9 If you need to install or replace the batteries, use two alkaline AAA batteries. a Press in the tab on the battery cover as you lift the cover off. b Install two batteries, inserting the + and - ends as shown. c Replace the battery cover and press it down until it clicks into place.
Connecting the Cables 14 Connecting the USB Cable for the Easy Interactive Pen VGA computer cable USB cable First you need to make sure that your computer is connected to your projector using the VGA computer cable that came with the projector. Connecting the VGA Computer Cable a b Locate the VGA computer cable connected to the projector. Connect the other end of the cable to your computer's monitor out port.
Using the Easy Interactive Pen The Easy Interactive Pen included with your Interactive Unit turn almost any wall or board into an interactive whiteboard. This chapter tells you how to calibrate your system and use the pens.
Calibrating 16 Calibration sets up the connection between your computer and the Easy Interactive Pen. This simple process ensures that your computer can accurately detect the position of the pen on the projection surface. You need to calibrate before using the pen for the first time, or if you change the resolution on your computer or connect a different computer. You can use either pen for calibration.
Calibrating 17 c Wait until you see a flashing green circle in the upper left corner of your projected image. d Touch the center of the circle with the tip of the pen. e Touch the center of the next circle, then repeat. When you get to the end of the row, the next circle appears at the left edge of a new row. The circle stops flashing and turns black. You see another circle on the right.
Using the Pen as a Mouse The Easy Interactive Driver allows you to use the pen as a mouse. If you installed interactive whiteboard software, you can also use the pens to write or draw on the projected image. s p.9 Press the button on the pen to test the batteries. If the indicator light is green, the batteries have enough power. Follow these tips to use the pen as a mouse: • For best performance, hold the pen at an angle (like a normal pen), rather than perpendicular to the board.
Solving Problems If you have a problem with your product, you can check the following section for troubleshooting information.
Problems and Solutions Easy Interactive Pen Problems 20 Calibration Problems • Make sure the USB cable is securely connected to the Interactive Unit and computer. Try disconnecting and reconnecting the cable to your computer. • If the flashing circles don't appear when you try to calibrate, make sure the USB cable is securely connected to the computer. s p.14 Try restarting the Easy Interactive Driver. s p.
Where to Get Help If you notice any problems or you think the Interactive Unit is broken, stop using it and contact your local dealer for further advice. Or visit http:// www.epson.com to locate a support or service representative in your area. Check the website periodically for updates to the Easy Interactive Driver software.
Notices
Specifications 23 Long wall plate General Image size Units: mm (in.) 63 to 102 inches (4:3 XGA) 482.6 (19.00) 60 to 96 inches (16:10 WXGA) Weight Approximately 2.3 kg (5.08 lb) with long wall plate Approximately 1.8 kg (3.97 lb) with short wall plate 1.45 kg (3.2 lb) without wall plate 8.5 (0.33) 25.4 (1.0) Dimensions 279.4 (11.0) 50.8 (2.0) Units: mm (in.) 71.5 (2.81) 58 to 93 inches (16:9 widescreen) 25.4 (1.0) 365.1 (14.37) 50.8 (2.0) Short wall plate Units: mm (in.) 8.5 (0.
Specifications 24 Mac OS Electrical Power supply voltage 5 V DC Current consumption 180 mA Environmental Temperature Operating: 5 to 35 ˚C (41 to 95 ˚F) (non-condensing) Storage: -10 to 60 ˚C (14 to 140 ˚F) (non-condensing) Operating altitude 0 to 2286 m (0 to 7500 ft ) Easy Interactive Pen Power consumption 57 mA Voltage 3 V DC Batteries AAA x 2, Alkaline Size 168 mm (6.61 in.), diameter 21 mm (0.83 in.) Weight 33 g (1.
FCC Compliance Statement For United States Users This equipment has been tested and found to comply with the limits for a Class B digital device, pursuant to Part 15 of the FCC Rules. These limits are designed to provide reasonable protection against harmful interference in a residential installation. This equipment generates, uses, and can radiate radio frequency energy and, if not installed and used in accordance with the instructions, may cause harmful interference to radio or television reception.
Declaration of Conformity According to 47CFR, Part 2 and 15 for: Class B Personal Computers and Peripherals; and/or CPU Boards and Power Supplies used with Class B Personal Computers: We: Located at: Epson America, Inc. MS 3-13 3840 Kilroy Airport Way Long Beach, CA 90806 Telephone: (562) 290-5254 Declare under sole responsibility that the product identified herein, complies with 47CFR Part 2 and 15 of the FCC rules as a Class B digital device.
Copyright Notice All rights reserved. No part of this publication may be reproduced, stored in a retrieval system, or transmitted in any form or by any means, electronic, mechanical, photocopying, recording, or otherwise, without the prior written permission of Seiko Epson Corporation. No patent liability is assumed with respect to the use of the information contained herein. Neither is any liability assumed for damages resulting from the use of the information contained herein.