
User's Guide


Table Of Contents
- Contents
- Introduction to Your Projector
- Setting Up the Projector
- Projector Placement
- Removing and Attaching the Cable Cover
- Adjusting the Angle of the Touch Unit
- Installing the Projector Feet
- Projector Connections
- Installing Batteries in the Remote Control
- Installing Batteries in the Pens
- Installing Batteries in the Control Pad
- Using the Projector on a Network
- Using Basic Projector Features
- Turning On the Projector
- Turning Off the Projector
- Selecting the Language for the Projector Menus
- Setting the Date and Time
- Image Shape
- Resizing the Image with the Wide and Tele Buttons
- Adjusting the Image Position
- Focusing the Image
- Remote Control Operation
- Selecting an Image Source
- Projection Modes
- Image Aspect Ratio
- Color Mode
- Controlling the Volume with the Volume Buttons
- Projecting a PC Free Presentation
- Adjusting Projector Features
- Using the Interactive Features
- Interactive Modes
- Using the Interactive Pens
- Using Finger Touch Interactivity
- Using BrightLink With a Computer
- Whiteboard Mode
- Using the Whiteboard Toolbars
- The Main Whiteboard Toolbar
- Selecting Background Templates
- Zooming Images in Whiteboard Mode
- Inserting and Working With Images
- Using the Shapes Tool
- Selecting Line Width and Color
- The Bottom Whiteboard Toolbar
- Selecting Whiteboard Settings
- Inserting a Document or Image From a Scanner
- Selecting a Networked Device Source
- Saving Pages in Whiteboard Mode
- Working With Thumbnail Pages
- Printing in Whiteboard Mode
- Emailing Your Whiteboard Pages
- Sharing the Whiteboard
- Annotation Mode (PC Free)
- Splitting the Screen
- Adjusting the Menu Settings
- Using the Projector's Menus
- Image Quality Settings - Image Menu
- Input Signal Settings - Signal Menu
- Projector Feature Settings - Settings Menu
- Projector Setup Settings - Extended Menu
- Projector Network Settings - Network Menu
- Projector Setup Settings - ECO Menu
- Projector Information Display - Info Menu
- Projector Reset Options - Reset Menu
- Maintaining and Transporting the Projector
- Projector Maintenance
- Transporting the Projector
- Solving Problems
- Projection Problem Tips
- Projector Light Status
- Using the Projector Help Displays
- Solving Image or Sound Problems
- Solutions When No Image Appears
- Solutions When Image is Incorrect Using the USB Display Function
- Solutions When "No Signal" Message Appears
- Solutions When "Not Supported" Message Appears
- Solutions When Only a Partial Image Appears
- Solutions When the Image is Not Rectangular
- Solutions When the Image Contains Noise or Static
- Solutions When the Image is Fuzzy or Blurry
- Solutions When the Image Brightness or Colors are Incorrect
- Solutions to Sound Problems
- Solving Projector or Remote Control Operation Problems
- Solving Interactive Problems
- Solutions When "Error Occurred in the Easy Interactive Function" Message Appears
- Solutions When the Interactive Pens Do Not Work
- Solutions When the Interactive Pen Position Is Not Accurate
- Solutions When Manual Calibration Does Not Work
- Solutions When the Interactive Pens Are Slow or Difficult to Use
- Solutions When the Interactive Pens Cause Interference or Unwanted Effects
- Solutions When Finger Touch Interactivity Does Not Work
- Solutions for Problems With Capturing, Printing, Saving, or Scanning
- Solutions When Inking Does Not Appear in Microsoft Office
- Solutions When the Pen Does Not Work Over a Network or the Toolbars Do Not Appear
- Solutions When the Time Is Incorrect in Whiteboard Settings
- Solving Network Problems
- Where to Get Help
- Technical Specifications
- General Projector Specifications
- Projector Lamp Specifications
- Remote Control Specifications
- Interactive Pen Specifications
- Touch Unit Specifications
- Projector Dimension Specifications
- Projector Electrical Specifications
- Projector Environmental Specifications
- Projector Safety and Approvals Specifications
- Supported Video Display Formats
- USB Display System Requirements
- Notices
Note: Digital cameras or smartphones must be USB-mounted devices, not TWAIN-compliant devices,
and must be USB Mass Storage Class-compliant.
Note: USB hard drives must meet these requirements:
• USB Mass Storage Class-compliant (not all USB Mass Storage Class devices are supported)
• Formatted in FAT or FAT32
• Self-powered by their own AC power supplies (bus-powered hard drives are not recommended)
• Avoid using hard drives with multiple partitions
You can project slide shows from image files on a connected USB device or memory card reader.
Parent topic: Connecting to External USB Devices
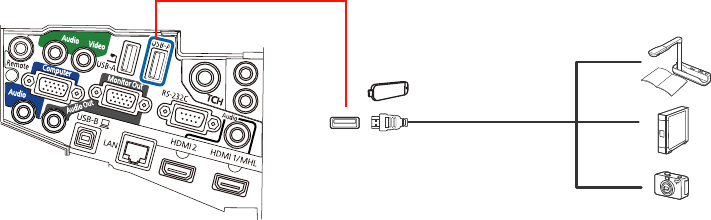
Connecting a USB Device or Camera to the Projector
You can connect your USB device or camera to the projector's USB-A port and use it to project images
and other content.
1. If your USB device came with a power adapter, plug the device into an electrical outlet.
2. Connect the USB cable (or USB flash drive or USB memory card reader) to the projector's USB-A
port shown here.
Note: Do not connect a USB hub or a USB cable longer than 10 feet (3 m), or the device may not
operate correctly.
3. Connect the other end of the cable (if applicable) to your device.
Parent topic: Connecting to External USB Devices
73