
User's Guide


Table Of Contents
- Contents
- Introduction to Your Projector
- Setting Up the Projector
- Projector Placement
- Removing and Attaching the Cable Cover
- Adjusting the Angle of the Touch Unit
- Installing the Projector Feet
- Projector Connections
- Installing Batteries in the Remote Control
- Installing Batteries in the Pens
- Installing Batteries in the Control Pad
- Using the Projector on a Network
- Using Basic Projector Features
- Turning On the Projector
- Turning Off the Projector
- Selecting the Language for the Projector Menus
- Setting the Date and Time
- Image Shape
- Resizing the Image with the Wide and Tele Buttons
- Adjusting the Image Position
- Focusing the Image
- Remote Control Operation
- Selecting an Image Source
- Projection Modes
- Image Aspect Ratio
- Color Mode
- Controlling the Volume with the Volume Buttons
- Projecting a PC Free Presentation
- Adjusting Projector Features
- Using the Interactive Features
- Interactive Modes
- Using the Interactive Pens
- Using Finger Touch Interactivity
- Using BrightLink With a Computer
- Whiteboard Mode
- Using the Whiteboard Toolbars
- The Main Whiteboard Toolbar
- Selecting Background Templates
- Zooming Images in Whiteboard Mode
- Inserting and Working With Images
- Using the Shapes Tool
- Selecting Line Width and Color
- The Bottom Whiteboard Toolbar
- Selecting Whiteboard Settings
- Inserting a Document or Image From a Scanner
- Selecting a Networked Device Source
- Saving Pages in Whiteboard Mode
- Working With Thumbnail Pages
- Printing in Whiteboard Mode
- Emailing Your Whiteboard Pages
- Sharing the Whiteboard
- Annotation Mode (PC Free)
- Splitting the Screen
- Adjusting the Menu Settings
- Using the Projector's Menus
- Image Quality Settings - Image Menu
- Input Signal Settings - Signal Menu
- Projector Feature Settings - Settings Menu
- Projector Setup Settings - Extended Menu
- Projector Network Settings - Network Menu
- Projector Setup Settings - ECO Menu
- Projector Information Display - Info Menu
- Projector Reset Options - Reset Menu
- Maintaining and Transporting the Projector
- Projector Maintenance
- Transporting the Projector
- Solving Problems
- Projection Problem Tips
- Projector Light Status
- Using the Projector Help Displays
- Solving Image or Sound Problems
- Solutions When No Image Appears
- Solutions When Image is Incorrect Using the USB Display Function
- Solutions When "No Signal" Message Appears
- Solutions When "Not Supported" Message Appears
- Solutions When Only a Partial Image Appears
- Solutions When the Image is Not Rectangular
- Solutions When the Image Contains Noise or Static
- Solutions When the Image is Fuzzy or Blurry
- Solutions When the Image Brightness or Colors are Incorrect
- Solutions to Sound Problems
- Solving Projector or Remote Control Operation Problems
- Solving Interactive Problems
- Solutions When "Error Occurred in the Easy Interactive Function" Message Appears
- Solutions When the Interactive Pens Do Not Work
- Solutions When the Interactive Pen Position Is Not Accurate
- Solutions When Manual Calibration Does Not Work
- Solutions When the Interactive Pens Are Slow or Difficult to Use
- Solutions When the Interactive Pens Cause Interference or Unwanted Effects
- Solutions When Finger Touch Interactivity Does Not Work
- Solutions for Problems With Capturing, Printing, Saving, or Scanning
- Solutions When Inking Does Not Appear in Microsoft Office
- Solutions When the Pen Does Not Work Over a Network or the Toolbars Do Not Appear
- Solutions When the Time Is Incorrect in Whiteboard Settings
- Solving Network Problems
- Where to Get Help
- Technical Specifications
- General Projector Specifications
- Projector Lamp Specifications
- Remote Control Specifications
- Interactive Pen Specifications
- Touch Unit Specifications
- Projector Dimension Specifications
- Projector Electrical Specifications
- Projector Environmental Specifications
- Projector Safety and Approvals Specifications
- Supported Video Display Formats
- USB Display System Requirements
- Notices
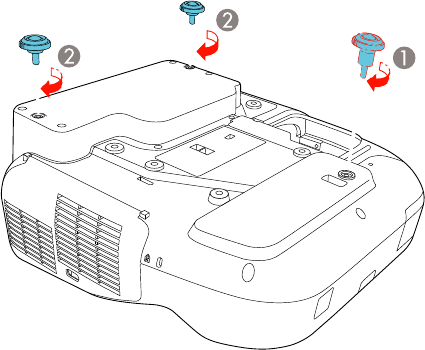
2. Insert the larger front foot into the hole at the front of the projector.
1 Front foot (larger)
2 Rear feet
3. Insert the two smaller rear feet into the holes at the back of the projector.
Parent topic: Setting Up the Projector
Projector Connections
You can connect the projector to a variety of computer, video, and audio sources to display
presentations, movies, or other images, with or without sound.
• Connect any type of computer that has a USB port, standard video output (monitor) port, or HDMI port.
• For video projection, connect devices such as DVD players, gaming consoles, digital cameras, and
smartphones with compatible video output ports.
• If your presentation or video includes sound, you can connect audio input cables, if necessary.
• For slide shows without a computer, you can connect USB devices (such as a flash drive or camera)
or an optional Epson document camera.
Caution: If you will use the projector at altitudes above 4921 feet (1500 m), turn on High Altitude Mode
to ensure the projector's internal temperature is regulated properly.
60