
User's Guide


Table Of Contents
- Contents
- Introduction to Your Projector
- Setting Up the Projector
- Projector Placement
- Removing and Attaching the Cable Cover
- Adjusting the Angle of the Touch Unit
- Installing the Projector Feet
- Projector Connections
- Installing Batteries in the Remote Control
- Installing Batteries in the Pens
- Installing Batteries in the Control Pad
- Using the Projector on a Network
- Using Basic Projector Features
- Turning On the Projector
- Turning Off the Projector
- Selecting the Language for the Projector Menus
- Setting the Date and Time
- Image Shape
- Resizing the Image with the Wide and Tele Buttons
- Adjusting the Image Position
- Focusing the Image
- Remote Control Operation
- Selecting an Image Source
- Projection Modes
- Image Aspect Ratio
- Color Mode
- Controlling the Volume with the Volume Buttons
- Projecting a PC Free Presentation
- Adjusting Projector Features
- Using the Interactive Features
- Interactive Modes
- Using the Interactive Pens
- Using Finger Touch Interactivity
- Using BrightLink With a Computer
- Whiteboard Mode
- Using the Whiteboard Toolbars
- The Main Whiteboard Toolbar
- Selecting Background Templates
- Zooming Images in Whiteboard Mode
- Inserting and Working With Images
- Using the Shapes Tool
- Selecting Line Width and Color
- The Bottom Whiteboard Toolbar
- Selecting Whiteboard Settings
- Inserting a Document or Image From a Scanner
- Selecting a Networked Device Source
- Saving Pages in Whiteboard Mode
- Working With Thumbnail Pages
- Printing in Whiteboard Mode
- Emailing Your Whiteboard Pages
- Sharing the Whiteboard
- Annotation Mode (PC Free)
- Splitting the Screen
- Adjusting the Menu Settings
- Using the Projector's Menus
- Image Quality Settings - Image Menu
- Input Signal Settings - Signal Menu
- Projector Feature Settings - Settings Menu
- Projector Setup Settings - Extended Menu
- Projector Network Settings - Network Menu
- Projector Setup Settings - ECO Menu
- Projector Information Display - Info Menu
- Projector Reset Options - Reset Menu
- Maintaining and Transporting the Projector
- Projector Maintenance
- Transporting the Projector
- Solving Problems
- Projection Problem Tips
- Projector Light Status
- Using the Projector Help Displays
- Solving Image or Sound Problems
- Solutions When No Image Appears
- Solutions When Image is Incorrect Using the USB Display Function
- Solutions When "No Signal" Message Appears
- Solutions When "Not Supported" Message Appears
- Solutions When Only a Partial Image Appears
- Solutions When the Image is Not Rectangular
- Solutions When the Image Contains Noise or Static
- Solutions When the Image is Fuzzy or Blurry
- Solutions When the Image Brightness or Colors are Incorrect
- Solutions to Sound Problems
- Solving Projector or Remote Control Operation Problems
- Solving Interactive Problems
- Solutions When "Error Occurred in the Easy Interactive Function" Message Appears
- Solutions When the Interactive Pens Do Not Work
- Solutions When the Interactive Pen Position Is Not Accurate
- Solutions When Manual Calibration Does Not Work
- Solutions When the Interactive Pens Are Slow or Difficult to Use
- Solutions When the Interactive Pens Cause Interference or Unwanted Effects
- Solutions When Finger Touch Interactivity Does Not Work
- Solutions for Problems With Capturing, Printing, Saving, or Scanning
- Solutions When Inking Does Not Appear in Microsoft Office
- Solutions When the Pen Does Not Work Over a Network or the Toolbars Do Not Appear
- Solutions When the Time Is Incorrect in Whiteboard Settings
- Solving Network Problems
- Where to Get Help
- Technical Specifications
- General Projector Specifications
- Projector Lamp Specifications
- Remote Control Specifications
- Interactive Pen Specifications
- Touch Unit Specifications
- Projector Dimension Specifications
- Projector Electrical Specifications
- Projector Environmental Specifications
- Projector Safety and Approvals Specifications
- Supported Video Display Formats
- USB Display System Requirements
- Notices
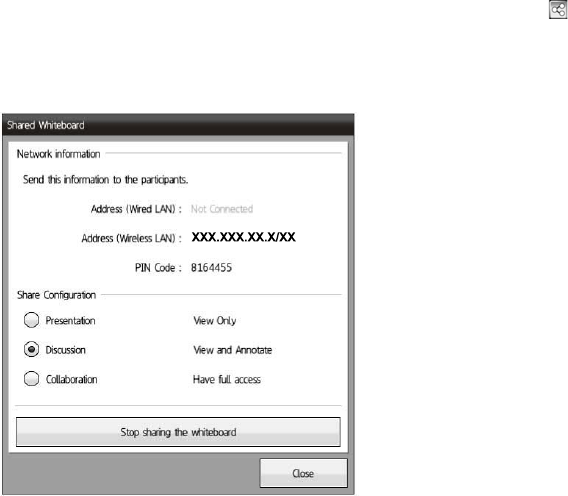
4. When connecting to the shared whiteboard, users must enter the PIN code. If you want to set your
own PIN code, select the PIN code field and enter a new 7-digit code.
Note: After you share the whiteboard, you cannot change the PIN code unless you restart the
whiteboard sharing session.
5. Select the Start button.
6. To set editing permissions for connected users, select the share icon on the bottom toolbar again.
You see the Shared Whiteboard dialog.
7. Select one of the following as the Share Configuration setting to permit access to features by
devices connecting to the whiteboard:
• Presentation: Connected devices can view and save the whiteboard screen.
• Discussion: Connected devices can draw on the shared screen.
• Collaboration: Connected devices can access all available features except creating a new
meeting.
Note: The projector displays connection information about the shared whiteboard under Network
information.
215