BrightLink™ Wall Mount Installation Worksheets Select a mounting option below to view the worksheet Projecting on a Plain Wall Projecting on a Pre-installed Wall-mounted Board
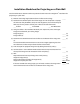
Installation Worksheet for Projecting on a Plain Wall Use this worksheet to determine where to position the wall mount for a BrightLink® installation for projecting on a plain wall. (1) Measure the ceiling height (distance from the floor to the ceiling). _____ (2) Determine the desired aspect ratio of the image. For new computers or laptops, this will most likely be WXGA (16:10). For older equipment, this will most likely be XGA (4:3). You may need to consult your IT director for this information.
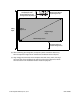
10 in. (254 mm) —height of wall plate plus cover Distance from ceiling to top of image area (d) Required distance from top of image area to wall plate (c) Ceiling height Height of image area (h) Diagonal image size (S) Width of image area (w) Distance from floor to bottom of image area (f) (8) After confirming your image size, use tape or a pencil to mark the distance (c) from the top of the image area on the board to the bottom of the wall plate.
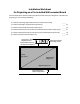
Installation Worksheet for Projecting on a Pre-installed Wall-mounted Board Use this worksheet to determine where to position the wall mount for a BrightLink® installation for projecting on a pre-existing whiteboard. (1) Measure the ceiling height (distance from the floor to the ceiling) _____ (2) Measure the height of the board’s image area (h). _____ (h) (3) Measure the width of the board’s image area (w).
(7) Determine the aspect ratio of the board or of the images that will be projected. For new computers or laptops, this will most likely be WXGA (16:10). For older equipment, this will most likely be XGA (4:3). You may need to consult your IT director for this information.