
Quick Guide


4 Introduction
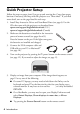
Quick Projector Setup
Follow the steps on pages 4 and 5 to get up and running fast. Copy these pages,
laminate if necessary, and keep with the projector as a “cheat sheet.” If you need
more detail, turn to the page listed for each step.
1. Install Easy Interactive Driver and TeamBoard Draw (see page 6). Use the
CDs that came with the projector, or download from:
epson.com/support/brightlinkdownloads (U.S.)
epson.ca/support/brightlinkdownloads (Canada)
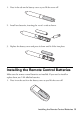
2. Make sure the batteries are installed in the interactive
pens and remote control (see pages 8 and 9).
Press the button on the pen. If the light turns green,
the batteries are installed and charged.
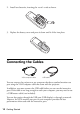
3. Connect the VGA computer cable and
USB cable to your PC or Macintosh
®
(see page 10).
4. Turn on the projector by pressing the P power button on the remote control
(see page 12). If you need to adjust the image, see page 13.
5. Display an image from your computer. If the image doesn’t appear, see
page 22 or try one of the following:
■ On some PC laptops, you may need to hold down the Fn key on the
keyboard and press
F7 or the function key that lets you display on an
external monitor. It may have an icon such as , or it may be labelled
CRT/LCD.
■ On a MacBook
®
, you may need to open your Display Preferences and
select
Detect Displays, Show displays in menu bar, or Mirror
Displays.
■ Try pressing the Source Search button on the remote control.