
Installation Guide
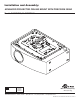

8 of 11
Visit the Peerless Web Site at www.peerless-av.com For Technical Support Contact Peerless Mounts at 1-800-865-2112
ISSUED: 04-01-08 SHEET #: 055-9254-19 02-28-14
B. PowerLite 6110i
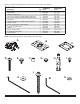
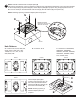
Hole Patterns
A. PowerLite 92, 93, 95, 96W, 905,
915W, 1835, 410W, 1830, 1915,
1925W, S17, X17, W17, 97, 98,
99W, 955W, 965
FRONT FRONT FRONT
D. PowerLite 1750, 1760W, 1770W, 1775W
FRONT
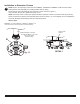
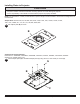
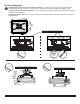
Attach adapter plate (B) to
projector using the three M4 x 20
mm socket pin serrated washer
head screws (D) and spacers (F),
andone#10atwasher(N).
NOTE: Retaining spacers go
between adapter plate and
projector.
D
N
B
FRONT
C. PowerLite Pro G5450WNL,
G5200WNL, G5650WNL,
G5350NL, G5150NL, G5550NL,
G5750WNL, G5950NL G5000,
4100, 4200W, 4300,
C
D
2
NOTE: SHOULDER
INDICATES THE BACK OF
ADAPTER PLATE (B)
FRONT
NOTE: Shoulder indicates back of adapter plate (B)
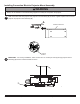
Flip projector upside down. Find your projector model from the hole patterns listed below. Using the holes indicated
on the corresponding hole pattern diagram, attach adapter plate (B) to projector using the appropriate number of
M4 x 20 mm socket pin serrated washer head screws (D),#10atwashers(N), and spacers (F).
NOTE: Retaining spacers go between adapter plate and projector.
F
B
N