
Operating instructions


4. Creating a PLC Project using SPEL AOIs
12
EPSON RC+ 7.0 Option AOI (Add-On Instructions) Rev.1
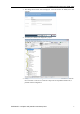
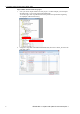
11-4. Click [?] next to [ExtInputs], type “Ep”, it will auto populate, press <Enter>.
11-5. Do same step to [ExtOutputs]. “SPEL_Init” is now configured and the rung lines
should change from red to blue.
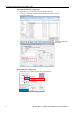
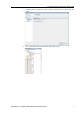
11-6. Do the same steps as in 11-1 to 11-2 for rung 3 and 5. Choose “MotorOn” for
rung 3, “MotorOff” for rung 5.
11-7. Do the same steps as in 11-3 for rung 3 and 5. Use “MotorOnCoil” for rung 3,
“MotorOffCoil” for rung 5.
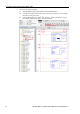
12. The program in now complete. Save the project.
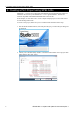
13. Click the down arrow right to [Path] to choose communication path with controller.
In this example I am using USB to connect my PC to the PLC controller.
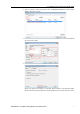
14. Double click on “USB” to close the window, then click <Download> in the next
window to transfer program to PLC controller.
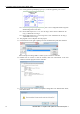
15. Click <Yes> in the next window if prompted to change PLC into “Remote Run” mode,
like shown below.