
Operating instructions


3. Configuring the Robot Controller
2
EPSON RC+ 7.0 Option AOI (Add-On Instructions) Rev.1
Outputs:
InCycle
BOOL output bit that indicates the status of execution of the AOI.
If this is high, then the AOI is executing.
Done
BOOL output bit that indicates the status of completion of the AOI.
If this is high, then the AOI execution is complete.
Error
BOOL output bit that indicates if an error occurred during execution.
ErrCode1 and
ErrCode2
INT error codes from the robot controller. These should be 0 in
normal operation, and one or both are greater than 0 when the Error
bit is high.
AOIs have additional inputs and/or outputs. These are described separately for each AOI
in the chapter 5.SPEL AOI Reference.
2.5 SPEL AOI General Operation
General operation of all SPEL AOIs is as follows:
1. SPEL_Init AOI must have been executed one time sucessfully before executing other
SPEL AOIs.
2. Set the Start input from low to high to start execution.
3. During execution, the Done and Error output bits are set to low and the InCycle output
bit is set to high.
4. After execution, the Done output bit is set to high and the InCycle output bit is set to
low. If an error occurred during execution, the Error output bit is set to high, and the
error code values ErrCode1 and ErrCode2 are set. See the chapter 6. Error Codes for
more information.
5. If an error occurs, SPEL AOI execution is prevented until the SPEL_ResetError AOI
is executed.
3. Configuring the Robot Controller
In this chapter we will describe how to configure the robot controller Fieldbus slave to
work with the PLC when using SPEL AOIs. Perform the following steps:
1. Start EPSON RC+ 7.0 on your PC.
2. Connect to the robot controller. You may need to configure a connection to the robot
controller in [Setup]-[PC to Controller Communications]. See the EPSON RC+ 7.0
User's Guide for instructions.
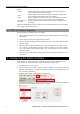
3. From the [Setup] menu, select [System Configuration].
4. Click [Controller]-[Inputs/Outputs]-[Fieldbus Slave]. Configure the number of input and
output bytes to 128 as shown below, then click <Apply>.