
Specifications


Epson PowerLite 755c/765c Projector
8/05 Epson PowerLite 755c/765c Projector - 5
If you’re using a Macintosh
®
with OS X:
You may need to set up your system to display on the projector
screen as well as the LCD screen. Follow these steps:
1. From the Apple
®
menu, select System Preferences, then
click
Displays.
2. Select
VGA Display or Color LCD, click Arrange or
Arrangement, and make sure Mirror Displays is checked.
If you’re using a Macintosh with OS 8.6 to 9.x:
You may need to set up your system to display on the projector
screen as well as the LCD screen. Follow these steps:
1. From the Apple menu, select
Control Panels, then click
Monitors or Monitors and Sound.
2. Click the
Arrange icon.
3. Drag one monitor icon on top of the other.
If the
Arrange option isn’t available, try selecting one of the
Simulscan resolution settings. Click the
Monitor icon, if
necessary, and then select a
Simulscan resolution. (Allow a few
seconds for the projector to sync up after making the selection.)
Selecting the Image Source
If multiple devices are connected to the projector, the easiest
way to select the image source is to press the
Search button on
the remote control or the
Source Search button on the
projector until the correct image is projected.
You can also press one of the following
Source buttons on the
remote control:
❏
Computer to select the device connected to the projector’s
Computer/Component Video port.
❏
S-Video to select the device connected to the
S-Video port.
❏
Video to select the device connected to the
Video port.
❏ EasyMP to project wirelessly or from a memory card.
After you select a source, the screen goes dark for a moment
before the image appears.
Adjusting the Image
Once you see your image, you may need to make certain
adjustments, as described in this section.
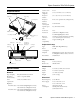
Focusing and Zooming Your Image
Rotate the focus ring to sharpen the image.
Rotate the zoom ring to reduce or enlarge the image.
You can also change the image size by moving the projector
closer to or farther away from the screen. You can use the
E-Zoom buttons on the remote control to zoom in on a portion
of the image. See “Zooming Your Image” on page 8 for
instructions.
Adjusting the Height of Your Image
If the image is too low, you can raise it by extending the
projector’s front foot.
1. Stand behind the projector. Press up on the blue foot release
lever and lift the front of the projector to extend the foot.
2. Once the image is positioned where you want it, release the
lever to lock the foot in position.
Focus ring
Zoom ring