User’s Manual EPoX ET106 Series TRADEMARK All products and company names are tradmarks or registered trademarks of their respective holders. These specifications are subject to change without notice. june,2009 Revision 1.
Table of Contents Safety Precautions................................................................................................3 Using electrical power..........................................................................................3 Chapter 1 Introduction.........................................................................................4 1.1 Package Checklist............................................................................................4 1.2 Specifications..................
Safety Precautions ・ Do not press or touch the display panel. ・ Do not spray water or any other cleaning fluids directly on the display. ・ Do not slam your netbook shut and never pick up or hold your netbook by the display. ・ Do not use this product near water. ・ Do not expose to direct sunlight. ・ Do not subject the computer to magnetic fields. ・ Avoid sudden changes in temperature or humidity by keeping it away from A/C and heating vents. ・ Do not tamper with the batteries. Keep them away from children.
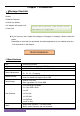
Chapter 1 Introduction 1.1Package Checklist Content Optional equipment • Netbook Computer • Liner bag • Lithium-Ion battery • Towel • AC adapter with power cord If you need an optional item, please contact • Power Line the dealer to negotiate • Driver and Applications CD • Service Manual ▲If you have any items inside the packaging of damage or shortages, please contact the dealer. Depending on the model you purchased, the actual appearance of your netbook may vary from that shown in this manual.
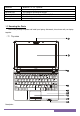
Bluetooth Digital Camera Ethernet LAN Wireless LAN Security Port Battery - Bluetooth™ V 2.0(Optional) Build-in 1.3 Mega pixels camera(Optional) 10/100Mbps Fast Ethernet Support Mini PCI-E interface,Support 802.11A/B/G One Kensington Lock Li-Ion battery pack 1.3 Knowing the Parts After check package complete and install your laptop, afterwards, let us know well your laptop together.
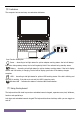
1 Built-in Camera :The built-in 1.3 megapixel camera allows you to snap a photo or create a video chat or video conference with just a click. 2 Display screen :Also called Liquid-Crystal Display (LCD), displays computer output. 3. Speakers :Left and right speakers deliver stereo audio output. 4 Keyboard :A full-size keyboard with dedicated Windows® keys.For entering data into your computer. 5 Microphone:Internal microphone for sound recording.
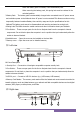
When the battery pack is inserted, it will automatically lock. When removing the battery pack, this spring lock must be retained in the unlocked position. 3 Battery Pack: The battery pack is automatically charged when connected to an AC power source and maintains power to the Netbook when AC power is not connected.This allows use when moving temporarily between locations.Battery time variel by usage and by the specifications for this Netbook.
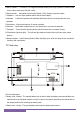
NO. Item Description 1 Headphones/speaker/line-out jack:Connects to audio line-out devices. (e.g., speakers, headphones). 2 Microphone-in jack :Accepts input from external microphones. 3 2 USB 2.0 ports :Connect to USB 2.0 devices. (e.g., USB mouse, USB camera). 4 External display (VGA) port :Connects to a display device.(e.g., external monitor, LCD projector). 5 Power button: This button turns your netbook on and off or puts it to sleep. (5). back view 1 ○ ② NO.
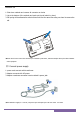
Extraction cell 1. Shut down netbook and remove all connector or device 2. Up at the bottom of the netbook and push out the cell switch by hand; 3. Cell spring will be allocated to switch out and hold it at the same time using one hand to remove the cell. ▲Please don’t forces remove the cell when your netbook is post status, otherwise maybe destroy the data of HDD or others symptom. (2) Connect power supply 1. power cord connects with transformer. 2. Adapter connects with AC power. 3.
(3) Indicators The computer has serveral easy-to-read status indicators. Icon Function Description Power :According to led light status for opinion adapter working status: the led will always light when being startup statue, the led will regularity blink if the netbook being standby status. Battery: According to led light status for opinion battery working status: if the led is display saffron and hint battery is charging, the led will be display green color if the battery charges complete.
Hotkeys The computer employs hotkeys or key combinations to access most of the computer's controls like screen brightness, volume output and the BIOS utility.
Chapter 2 BIOS Setup Utility 2.1 When to Use BIOS Setup? You may need to run the BIOS Setup when: a. An error message appears on the screen during the system booting up and is requested to run SETUP. b.You want to change the default settings for customized features. c.You want to reload the default BIOS settings. 2.2 How to Run BIOS Setup? To run the BIOS Setup Utility, turn on the netbook and press the key during the POST procedure.
Save configuration changes and exit setup 2.4 Boot Device Priority You would sight as following information after startup netbook meanwhile,:Press ESC for Q-Boot please press "ESC" key and will display as right menu, afterwards, can choice your needs boot-device in the menu. Notes: The menu will difference if you installs difference of device on your netbook.Please select 2.5 boot device: BIOS Menu Please according to your needs to set in the BIOS setup utility. 2.5.
This allows you to enable or disable the full screen logo display feature. • Back to Boot Setup Menu ► Boot Device Priority Click key to enter submenu, it will be display specifies the boot sequence from the available devices. ► Hard Disk Drives Click key to enter submenu, it will be display specifies the boot device priority sequence from available hard disk drives.
• Save Changes and Exit : Save the changes you have made and exit the utility. • Discard Changes and Exit : Exit the utility without saving the changes you have made. • Discard Changes : Abandon your changes and reload the previous configuration before running the utility. • Load Optimal Defaults : This option opens a dialog box that let you install optimized defaults for all appropriate items in the Setup Utility.
Power Saving: Operating system will automatically lower frequency and save the power resource. Normal Performance: Operating system will run on normal frequency under this mode. Super Performance: Operating system will automatically over clock and runs on the best performance.( Optional) Auto: According to your netbook needs and automatically setting mode.
4. After a connection has been established, connection is shown on the list. 5. You can sight the wireless network icon in the Notification area. Note: The wireless connection icon will disappear when you Press + key to disable the wireless LAN function. Troubleshooting Warning: Under the condition that you can’t handle trouble, please refer to your dealer to get professional service.
supplies to on the machine. Connect AC Adapter to recharge it Netbook Can’t be recharged after connecting AC Adapter Check temperature of battery pack’s surface. Battery pack can’t be recharged if its temperature is too high or too low. Recharged it after its temperature is the same with the normal environment one. If battery pack is fully discharged, it won’t be recharged at once. Please wait for some min-utes Battery life depends on using condition of Note-book.
Make sure the system isn’t in the mode of Hibernation or Standby Printer Trouble The data can’t be output from Netbook to printer Error printing Solution Make sure printer is powered on. Make sure its cable is OK and its USB interface is well connected to Netbook Please refer to the user’s manual of your printer for help Audio Trouble Solution Adjust sound controller Check the setting of sound volume of software No sound emitted Check if the ear phone is firmly connected.