
User guide


Networking
88
Lecture Recorder x2 User Guide
11.3.2 Set the Lecture Recorder x2 to use a DHCP server
By default, the Lecture Recorder x2 is configured to connect to a network using a
DHCP server, the DHCP server will automatically configure the network settings and
assign a relevant IP address to the Lecture Recorder x2. This section describes how
to re-enable DHCP settings if they have been disabled.
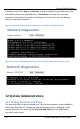
1. Log into the Web admin interface.
2. Select Network from the main menu.
3. Select Use DHCP.
4. If required, in the MTU Size field specify the largest packet size permitted
for Internet transmission. If this value is too large for the connection, it
may result in packet loss or dropping Internet connection.
5. The other fields can be left as is.
6. Select Apply to save these changes.
7. Select Maintenance.
8. Select Reboot Now. It takes a few minutes for the Lecture Recorder x2
device to reboot.
9. After a few minutes log into the Web admin interface. Logging into the
Web admin interface can be done by:
a. See the section Network Discovery of the Lecture Recorder x2 on
how to obtain the IP address for Lecture Recorder x2
b. Using a browser and browsing to the new IP address assigned to
the Lecture Recorder x2.
c. Using the Network Discovery Utility, see section Logging into the
Web Admin Interface for more details.
10. Re-log into the Web admin interface using the administrator username and
password.
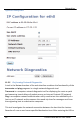
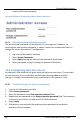
The following diagram shows the network page from the Web admin interface and
enabling DHCP.