
User guide


Recording
81
Lecture Recorder x2 User Guide
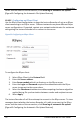
10.10.5 Testing the Automatic File Upload
Test the automatic file upload to ensure all settings are correct.
To test automatic file upload:
1. Confirm that the upload server is operating.
2. Start recording the stream.
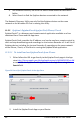
3. Log into the Web admin interface.
4. Select Automatic File Upload, from the main menu.
5. Set the How Often setting to On file rotation.
6. Click the Reset button in the main menu. The file currently being recorded
will be closed and saved.
7. The recording will then be uploaded to the configured remote path using
the configured client.
8. Check the server to confirm that the most recently saved video file has
been uploaded to it and it is in the proper path location on that server.
If the file is not uploaded, click Show log of automatic file upload to view the log.
Verify that the client configuration and Automatic File Upload configuration settings
are correct. Check the remote device’s root path, if the remote path is incorrectly
configured, the broadcast file will be uploaded to that location.
Check the Recorded Files page from the Web admin interface.
If the Remove after upload checkbox is selected, the uploaded file should have been
deleted from the Archive section.
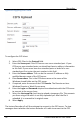
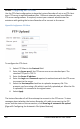
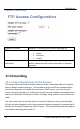
10.11 FTP Server
An FTP server can be configured on the Lecture Recorder x2 to enable a FTP client to
connect to the Lecture Recorder x2’s internal solid state memory. An FTP client can
be used to manually download video files from the Lecture Recorder x2. FTP access
can also be given permission to delete video files remotely from the Lecture
Recorder x2.
The FTP access options are accessible from the Web admin interface’s main menu,
FTP Server.