
User guide


Recording
79
Lecture Recorder x2 User Guide
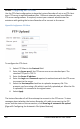
server and the status of the connection, click Show log of automatic file upload
(Figure 49 Configuring the Automatic File Upload Feature).
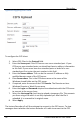
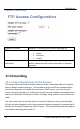
10.10.3 Configuring an RSync Client
Use the RSync client configuration to have the Lecture Recorder x2 act as an RSync
client connecting to an RSync server. Different networks may have different Rsync
server configurations. If required, contact your network administrator for assistance
with getting the Lecture Recorder x2 to connect to the server.
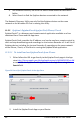
Figure 51 Configuring an RSync Client
To configure the RSync client:
1. Select RSync Client in the Protocol field.
2. Enter the Server address.
3. Enter Server module which is a directory on the RSync server.
4. Enter the Login and Password required to authenticate with the RSync
server to connect to the server share.
5. Select the Checksum checkbox to enable computing checksums algorithm
applied during file synchronization between sender and recipient servers.
6. Select Apply.
The Lecture Recorder x2 will then attempt to connect to the RSync server. To view
messages about whether the Lecture Recorder x2 is able to connect to the RSync
server and the status of the connection, click Show log of automatic file upload
(Figure 49 Configuring the Automatic File Upload Feature).