
User guide


Recording
78
Lecture Recorder x2 User Guide
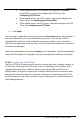
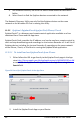
Figure 50 Configuring a CIFS Client
To configure the CIFS client:
1. Select CIFS Client in the Protocol field.
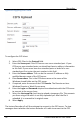
2. Enter the Server port if the CIFS server uses a non-standard port. If your
CIFS server uses standard ports you should not have to add any information
to this field. If your server uses non-standard ports or looks for a non-
standard port first, enter the port number in this field.
3. Enter the Server address. This can be the numeric IP address or fully
qualified domain name of the CIFS server.
4. Enter Server share. This is the CIFS share name or the name of the
Windows shared folder on the CIFS server.
5. If required, enter the name of the CIFS Domain. The Domain can be a
Windows Domain or Work Group name.
6. Enter the Login and Password required to authenticate with the CIFS server
to connect to the server share.
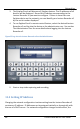
7. Select the Use temp file check box to upload a temporary file. This prevents
you from using a file which is not fully uploaded yet. After the file is
uploaded, it is renamed to its original name.
8. Select Apply.
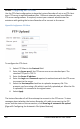
The Lecture Recorder x2 will then attempt to connect to the CIFS server. To view
messages about whether the Lecture Recorder x2 is able to connect to the CIFS