
User guide
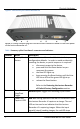


Physical Attributes
8
Lecture Recorder x2 User Guide
blinking.
Green and blue LEDs: When the Lecture Recorder x2
device first starts up, the blue LED lights up. A few
seconds later the green LED lights up. After about
another 20 seconds the blue LED turns off, leaving the
green LED on indicating that the Lecture Recorder x2
has started up and can start capturing images. During
operation the blue LED blinks during video signal test
operation and when the system tunes video
parameters (e.g. VGA parameters).
Blue LED: The blue LED blinks to indicate that the
Lecture Recorder x2 is recording received images. If the
files are not being recorded, the blue LED remains off.
Note: Sometimes it may take more than 20 minutes to
power up the device. During this time the blue LED is
on and the green LED is blinking. It means that the
Check disk function started automatically when the
device powered up.
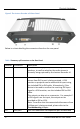
4
USB port
This expansion port allows the connecting of any of the
following to the Lecture Recorder x2: an external HDD,
a USB flash drive, a remote mouse control for the
starting/stopping of a recording, or an RS-232 serial
port for remote controls.
It is important to note that due to resource constraints,
simultaneous usage of multiple USB devices can
seriously affect the performance of the Lecture
Recorder x2.
5
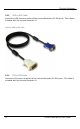
S-Video input
Use this port to connect an S-Video source. To connect
a composite video source, use a Composite to S-Video
adapter which is included in the standard Lecture
Recorder x2 package.
6
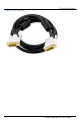
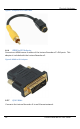
DVI In
Connects a DVI source to the Lecture Recorder x2 using
the included DVI cable. To connect a VGA source, use
the included VGA to DVI adapter. To connect an HDMI
source (non-copy protected content) use the included
HDMI to DVI adapter.
7
Audio In
Connects a microphone or audio source. The input can
be mic or line.
The rear panel is illustrated below.