
Specifications


Lecture Recorder x2 User Guide 1-4 Configure Date and Time
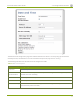
Label Description/Options
Date The current date. (This is the current date even if the radio button Set time manually is
not selected.)
Time The current time. (This is the current time even if the radio button Set time manually is
not selected.)
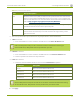
Change the Time Zone
By default the device has the Canada/Eastern time zone set. Configuration of the time zone is necessary to
ensure synchronized time servers provide the correct time to the device.
To select another time zone:
1. Connect to the admin interface using your preferred connection mechanism. See Connect to the Admin
Interface.
2. Login as admin.
3. Select the Date and Time link in the Configuration menu; the date and time configuration page opens.
4. Select the new time zone from the Time Zone drop down box.
5. Click Apply.
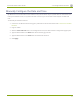
Configure Synchronized Time (NTP, PTP v1, and RDATE)
By default the Lecture Recorder x2 uses the network time protocol server (NTP server) protocol and the time
server from National Research Council Canada. You can continue to use this time server or configure a new
server that is more appropriate for your network and location. Your system administrator can provide the
correct time synchronization server settings.
To set the time synchronization method:
1. Connect to the admin interface using your preferred connection mechanism. See Connect to the Admin
Interface.
2. Login as admin.
3. Select the Date and Time link in the Configuration menu; the date and time configuration page opens.
4. Click the Enable time synchronization radio button if it is not already selected.
5. Choose one of the following choices from the Protocols drop down:
34