
Specifications


Lecture Recorder x2 User Guide 5-3 File and Recording Transfer
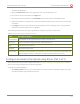
Table 24 CIFS Automatic FileUpload ConfigurationOptions
Name Description / Options
Server Port The CIFS server port. Leave blank to use the default port, or enter the port used for your
CIFS server.
Server address The IP address (or fully qualified domain name) of the CIFS server.
Server share The name of the shared folder on the CIFS server.
Domain The CIFS server's Windows domain or Work Group name . Needed if the server is part of
Active Directory or a DomainController.
Login Username for the CIFS server.
Password Password for the CIFS user.
Use temp file Causes files to be named with .part extension on the server during active upload. When the
upload completes, the file is renamed to the appropriate extension (.mov or .avi).
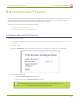
Upload to an External USB Drive
The device is equipped with USB ports that can be used to copy files from internal storage to external USB flash
drives or hard drives. An example use of this feature is to provide speakers with a copy of their presentation
before they leave the presentation venue.
The external drive must be formatted with one of the following file systems:
l FAT16 l FAT32 l XFS
l EXT2 l EXT3 l EXT4
File transfer to a USB drive occurs in one of the following ways. This section describes the procedures.
l One-Time Copy/Move of All Recorded Files to USB Drive
l Manually Copy Recorded Files to USB Drive
l View Available USBStorage Space
l Safely Eject the USBDrive
Only one copy or move toUSBoperation is permitted at a time, even though the UI may appear to
let you start a second one. Please wait until the first is complete before starting a new operation.
125