
Specifications

Lecture Recorder x2 User Guide 5-3 File and Recording Transfer
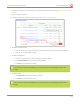
7. If desired, check Remove after upload to have the files deleted from local storage when upload
completes.
8. If desired, check Mark file as downloaded to have the color of the file link in the file archive list change
to show the files are downloaded. This only applies if the files are not deleted after upload is complete.
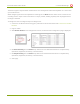
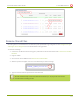
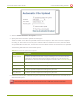
9. Select the protocol or destination for upload. The following table describes the options.
Table 21 Automatic FileUpload Interval Options
Name Description
FTPClient The device uploads to an FTP server.
RSync Client The device uploads to a network location using RSync to copy the file.
CIFSClient The device uploads to a network location using CIFS (also known as SMB or
samba) such as a shared folder on a Windows machine.
10. Follow the procedure below for configuring your selected protocol.
Configure Automatic File Upload to an FTP Server (Part 2 of 2)
This procedure assumes you have completed the steps in Configure Automatic File Upload (Part 1 of 2) and
wish to continue with configuration of upload to an FTP Server.
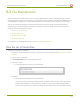
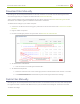
To configure upload to an FTP server:
1. Select FTP Client from the protocol drop down list in the Automatic File Upload configuration page; the
lower half of the page reflects the selection.
2. Specify the target Server address. If your device is configured with DHCP or has a valid DNS
configuration (see Configure Network Settings), you can use the server’s fully qualified domain name
121