
Specifications
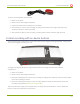

Lecture Recorder x2 User Guide 5-1 Create Recordings
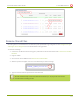
To control recordings with the red button:
1. Power on the device.
2. Attach sources and configure the device.
3. Connect the red button to a USB port on the device.
4. Press the button once to start recording; recording starts and the button lights red, after a few
moments it flashes to confirm recording.
5. Press the button again to stop recording; recording stops and the red button light turns off.
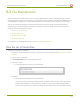
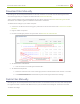
Control recording with on-device buttons
The Lecture Recorder x2 has a button on the side of the unit that toggles recording. By default, a single press
of this button toggles recording on or off.
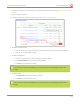
To toggle recording on/off with the right on-device button (assuming the button has its default
configuration):
1. Power on the device.
2. Attach sources and configure the device.
3. Press the recording button once to start recording; recording starts. If desired, check the web interface
to see that recording is started.
4. Press the recording button again to stop recording. If desired, check the web interface to see that
recording is stopped. See View the List of Stored Files
The Lecture Recorder x2 gives you the opportunity to change this button behaviour. You can disable the
button or make use of both buttons if you wish.
112