
Specifications


Lecture Recorder x2 User Guide 5-1 Create Recordings
5-1
Create Recordings
Your Lecture Recorder x2 can record the encoded stream to a multi-track file.
This section describes the following topics for creating and configuring recordings via the web interface.
l Control recording via the web interface
l Configure thetype and length of recording files
l Close the current recording file while recording
l Control recording with the big red button
l Control recording with on-device buttons
l Control recording with a USB keyboard or mouse
See Control with HTTPCommands and Control with RS-232 / Serial Port for information on controlling
recordings with third party tools. See File Maintenance to learn how to download the recorded files.
Recording can also be controlled via the tablet interface. See Control recording via the tablet
interface.
Recording basics
While recording a channel, a new file is created each time the maximum time or size limit is met. When
configuring these limits you can choose to have recording stop when there is no signal present in the sources.
See Configure thetype and length of recording files. This can be very useful to save disk space, but can cause
multiple files for a single session if the session involves switching presenters or input types.
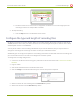
Control recording via the web interface
To start and stop recording:
1. Connect to the admin interface using your preferred connection mechanism. See Connect to the Admin
Interface.
2. Login as admin or operator.
3. To Start Recording:
a. Click the red Start button in the Recorder Status section; the recording starts and a timer
indicates how long it has been recording.
108