
Phau Ntawv Qhia

Operating Instructions
Page 2 of 2
RF1A-OT - Wireless Receiver
with RFRP-HW-OT
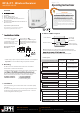
5. Resetting the RF1A-OT receiver
Press the button located on the side of the receiver. The RF1A-OT
receiver is now reset.
RESET
Press the button on the RF1A-OT receiver.
6. To connect the RFRP-HW-OT thermostat to an RF1A-OT
receiver
Connect
Press the button.
The thermostat will show “nOE” followed by “---”
Once an RF connection has been established the thermostat will show ‘r01’
on the LCD screen.
Press the ‘OK
The thermostat is now connected to the RF1A-OT receiver.
Connect
On the RFRP-HW-OT thermostat:
On the RF1A-OT receiver:
Please note, If you are installing a CP4-HW-OT, the RFRP-HW-OT thermostat
and the RF1A-OT receiver will have a pre-established RF connection so it is
not necessary to carry out the RF connection process below.
Connect
Connect
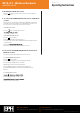
7. To disconnect the RFRP-HW-OT thermostat from an
RF1A-OT receiver
Press the button.
The thermostat will begin to search through the RF channels.
Press and hold the ‘Copy’ button for 10 seconds.
‘Adr’ will appear on the screen of the thermostat.
Press the ‘OK’ button twice to complete the unpairing process.
The thermostat RFRP-HW-OT is now disconnected from the receiver
RF1A-OT.
This can be done from either the thermostat or the receiver.
7.1 On the RFRP-HW-OT thermostat:
7.2 On the RF1A-OT receiver:
Red & green lights if using as a hub receiver.
The RF connection is now cleared.
20221005_RF1A_OT_RFRP-HW-OT_Opins_PK
EPH Controls Ireland
technical@ephcontrols.com www.ephcontrols.com
EPH Controls UK
technical@ephcontrols.com www.ephcontrols.co.uk