
Instructions / Assembly


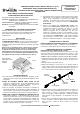
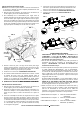
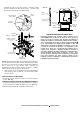
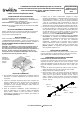

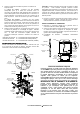

FIG. 10
Male
connector
FIG. 11
Housing
When using the “quick-connect” wire connectors, be sure that
there are no loose/exposed wire strands. Wrap each wire
connection using UL Listed electrical tape.
FIG. 8
Flathead
Screwdriver
Pry out
knockout
Female
connector
LED trim
Torsion
spring
arms
Torsion
spring
arms
C-bracket
Rectangular
Knockout
_____________________________
FIVE-YEAR LIMITED WARRANTY
Envirolite
warrants this product to be free from defects in
material and workmanship for five (5) years from the original
date of purchase by the consumer. This warranty is limited to
the counter replacement at the time of purchase, with the
f
Round
Knockout
FIG. 9
Slide NM cable
into locking slot
NM Cable
(ROMEX)
original purchase receipt. Envirolit
e
will not be liable
f
o
r
the
loss or damage of any kind, incidental or consequential
damages of any kind, whether based on warranty contract or
negligence, and arising in connection with the sale, use or
repair of the product claimed to be defective. Some states do
not allow the exclusion or limitation of incidental or
consequential damages so the above limitation may not apply
to you. This warranty gives you specific legal rights and you
ma
y
also have othe
r
ri
g
hts, which var
y
from state to state.
“Quick-
Connect” wire
connectors
y
g
y
Misuse, accident, improper installation or maintenance will also
void the warranty.
NOTE: Additional lighting fixtures may be connected to the
fixture’s junction box. Several knockouts are provided on the
junction box to accommodate additional BX or NM cables
intended to connect to other fixtures. A marking on the junction
box door specifies the maximum number of wires and the
i
i
h
b
id
i
h
ji
b
Junction
box door
max
i
mum w
i
re gauge t
h
at can
b
e
i
nserte
d
i
nto t
h
e
j
unct
i
on
b
ox.
4. Close the junction box door until the metal latch snaps,
making sure that all wiring and wire connectors are
contained within the box.
TRIM INSTALLATION
1. Plug the female connector of the LED trim onto the male
connecto
r
of the housin
g
.
(
FIG. 10
)
g
(
)
2. Squeeze both torsion spring arms together and insert into the
provided C-brackets of the housing. Tuck all wires into the
housing and carefully push the LED trim into the housing.
(FIG. 11)
3. Installation is complete. Restore electrical power.
ALL RIGHTS RESERVED. COPYRIGHT Envirolite 2020