
Installation manual


9
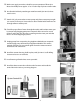
Look through the hole and make sure there are no kinks or twists in the
ducting. Pull the ceiling box down through the hole in the ceiling. While
holding it in place, install a 1-3/8” drywall screw through the drywall into the
ange of the ceiling box on each side to temporarily hold the box in place.
Remove ceiling grill and screws from its packaging. Center the grill over the
ceiling box. Install the grill with the white screws provided by screwing
through the ange of the ceiling box. Some ceiling surfaces are uneven and
may cause a small gap to be present. This can easily be caulked later if
excessive.
Repeat these steps at each location
Return to the attic and go to each location. Using the nylon straps and the pan
head screws provided, support the duct to the framing. Make sure the motor
head is still level and the dampers still close naturally. This will stabilize the
entire assembly. Replace any insulation that was removed.
Repeat these steps at each location
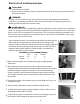
VERY IMPORTANT!
Remove the shipping tape from the back draft
dampers. Make sure the dampers will open and close easily and without
obstruction.
Repeat these steps at each location
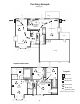
Once all of the QuietCool fans are hung, it’s time to go below and install the
ceiling box and ceiling grill at each intake location.
8.
9.
10.
11.
12.
13.
14.
T
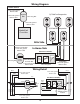
he installation is now complete except for the electrical work necessary to
make them operate. The electrical wiring for the fan requires a 120 volt three
prong outlet within 6 feet of the motor head in the attic.
T
he outlet should be wired to and controlled by a two-gang or three-gang box
installed in the hallway wall with a timer and switch for each fan.
VERY IMPORTANT!
Make sure the fan blade spins freely. This is very
important to system operation.
!
!