
Installation manual


8
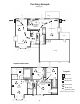
Now that you have determined in which areas you would like to install your
QuietCool fans, it’s time to go into your attic to mark the exact location for each
install from above.
When you nd a location, move the insulation away to get a clear view. Make
sure the template ts between the framing, and there are no other
obstructions in your chosen location. If there is a reason you can not use the
exact spot, nd a location in the area that does work. Place the template on
the spot and mark it by making a hole at each corner with a screwdriver.
Repeat these steps at each location
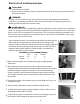
Once all locations are marked, move the insulation away and return below to
the house. It’s now time to cut the holes at each air intake location.
Place the cut-out template at each location making sure you have 2 inches of
clearance all the way around it. The grill that will be installed later is larger than
the template. While holding the template in place, mark around it with a
pencil. Using a drywall saw, or similar device, cut out the hole.
Repeat these steps at each location
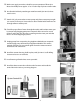
Open and unpack each QuietCool fans. Make sure all parts are present. Most of
the system comes pre-assembled. The main assembly should be put up in the
attic through the crawl hole and moved into position near the ceiling cutout
hole.
It’s now time to hang the motor heads from the rafters. Your goal is to hang
the motor head as far from the hole in the ceiling as possible, while making
sure the ceiling box and duct will easily reach the hole.
Using the metal strapping attached to the motor head assembly, and the gray
deck screws provided, hang the motor head from the rafters. Make sure the
motor head is fairly level side to side. Again, make sure the ducting will reach
the ceiling cut out with a little slack. You will need to secure the ducting later
in these instructions.
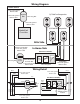
QuietCool fan installation instructions
1.
2.
3.
4.
5.
6.
7.