
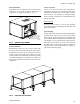
Specifications

JOHNSON CONTROLS
14
FORM ET102.19-NOM1 (809)
Every Three to Six Months
• Check fan bearing grease line connections. Lines
should be tight to the bearings.
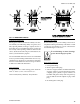
• Re-lubricate fan bearings.
• Check motor lubrication. Recommendations are
provided on the motor label.
• Check bearing and motor bracket bolt torque (see
Table 1).
• Align fan and motor sheaves. Tighten sheave
setscrews to the proper torque (see Table 1).
• Check and adjust fan belt tension.
• Tighten electrical connections
• Inspect coils for dirt build-up or coil freeze-up.
Every Year
• Inspect the units casing for corrosion. If damage
is found, clean and paint the surface with a rust-
resistant primer and vinyl chlorinated lacquer.
• Clean the fan wheel and fan shaft. Remove rust
with an emery cloth and apply a coat of heavy
duty rust inhibitor.
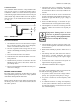
• Clean the coils. Using a n comb straighten any
bent ns.
• Inspect the condensate pan and drain line; remove
sludge or foreign materials that might obstruct
proper drainage. Remove obstructions.
• Check damper linkages, set screws and blade
adjustment. Clean, but do not lubricate, the nylon
damper rod bushings.
• Clean damper operators.
• Inspect the control and power box wiring for
secure connections and insulation.
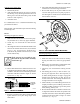
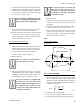
• Rotate the fan wheel and check for obstructions
in the fan housing. The wheel should not rub
on the fan housing. Adjust the wheel to center
if necessary and tighten wheel setscrews to the
proper torque (see Table 1).
• Check condition of gasketing and insulation
around unit, door and dampers. Repair or replace
as necessary.
• Examine ex connections for cracks or leaks.
Repair or replace damaged material.
Drain Pan
Inspecting and Cleaning Drain Pans
If evidence of standing water or condensate overow
exists, identify and remedy the cause immediately.
(Refer to the troubleshooting section for possible causes
and solutions.) If microbial growth (mold) in the drain
pan is observed, clean the pan immediately using the
following procedure:
1. Disconnect all electrical power to the unit, tag and
lock out power source.
2. Put on appropriate personal protective equip-
ment.
3. Remove all standing water.
4. Use a scraper or other tools to remove any solid
matter. Remove solid matter with a vacuum device
that uses high efciency particulate arrestance
(HEPA) filters with a minimum efficiency of
99.97% at 0.3-micron particle size.
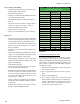
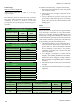
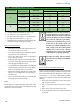
TABLE 1 - MINIMUM HEX HEAD BOLT TORQUE
IN LB-FT - GRADE 5 BOLT
Size (inches*)
Thread
Designation
Min. Torque
¼-20 UNC 6
5/16-18 UNC 14
5/16-24 UNF 16
3/8-16 UNC 24
3/8-24 UNF 28
7/16-14 UNC 42
7/16-20 UNF 45
½-13 UNC 69
½-20 UNF 83
9/16-12 UNC 99
9/16-18 UNF 118
5/8-11 UNC 150
5/8-18 UNF 176
¾-10 UNC 254
¾-16 UNF 301
7/8-9 UNC 358
7/8-14 UNF 422
1-8 UNC 500
1-14 UNF 602