
Network Router User's Manual

Installing and Removing Modules
3-20 Matrix X16-C Chassis Setup
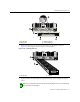
Removing a Fan Tray
Toremoveafantray,proceedasfollows:
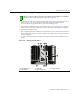
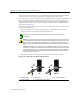
1. LocatetheESDwriststrapshippedwiththeMatrixX16‐Cchassis.AttachtheESDwriststrap
toyourwristandplugthecablefromtheESDwriststrapintotheESDgroundingreceptacle
attheupperrightcornerofthechassis,as
showninFigure 3‐10.
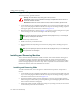
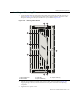
2. Removethebottombezel,asshowninFigure 3‐17onpage 3‐19,bylooseningthetwocaptive
screwssecuringittothechassisandliftingitoffthefantrayflanges.
3. Pullthefantrayfromthechassis.
4. Installanewfantrayasdescribedearlier.
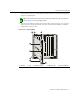
5. Replacethe
bottombezelbyliftingitontothefantrayflangesandre‐attachingthecaptive
screws.
Installing and Removing Modules
ThissectiondescribestheinstallationofIOMs,andFabricandControlModules.Althoughyou
canpopulateanyemptyslotwithitsappropriatemodule,allchassisaredeliveredwithout
coverplatesontheIOM,andFabricandControlModuleslotslabeledas1.Slotsacceptmodules
thataresizedappropriatelyforthose
slotsonly.Thatis,onlyIOMscanfitintoIOMslots,Fabric
ModulesintoFMslots,andControlModulesintoCMslots.
Installing and Removing IOMs
ToinstallanIOMmodule,refertothefiguresasindicatedinthestepsbelowandproceedas
follows:
1. LocatetheESDwriststrapshippedwiththeMatrixX16‐Cchassis.AttachtheESDwriststrap
toyourwristandplugthecablefromtheESDwriststrapintotheESD
groundingreceptacle
atthebottomofthechassisasshowninFigure 3 ‐10.
2. Unpackthemodulebytakingitfromitsshippingbox,removinganypackagingmaterials,
andremovingthemodulefromitsprotectiveplasticbag.(Savetheshippingboxandmaterials
intheeventtheunitmustbereshipped.)
3. Examine
themodulecarefully,checkingfordamage.Ifanydamageisfound,donotinstallit.
ContactEnterasysNetworksforinstructions.
Warning: Allow fan blades to stop running prior to fan tray removal.
Advertencia: Espere a que los ventiladores se detengan completamente antes de remover el
sistema de ventilacion del chasis.
Warnhinweis: Warten sie mit dem Ausbau der Lüfter, bis diese zum Stehen gekommen sind.
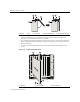
Note: If you are removing the top bezel, note that the fan tray flanges face up, so in removing the
bezel, lift it up and away from the chassis.
Note: If you are replacing the top bezel, note that the fan tray flanges face up, so in re-attaching the
bezel, pull it down over the flanges.