
Network Router User's Manual


Installing and Removing a Fan Tray
3-18 Matrix X16-C Chassis Setup
Installing and Removing a Fan Tray
TheMatrixX16‐Cchassisisequippedwithremovablefantraysthatallowforeasy periodic
replacementifafanfails.Toinstallandremoveafantray,referto“InstallingaFanTray”on
page 3‐18and“RemovingaFanTray”onpage 3‐20.
Installing a Fan Tray
Toinstallafantray,refertothefiguresasindicatedinthestepsbelowandproceedasfollows:
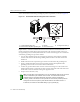
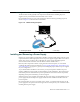
1. LocatetheESDwriststrapshippedwiththeMatrixX16‐Cchassis.AttachtheESDwriststrap
toyourwristandplugthecablefromtheESDwriststrapintotheESD
groundingreceptacle
atthebottomofthechassisasshowninFigure 3 ‐10.
2. Unpackthefantraybytakingitfromitsshippingboxandremovinganypackagingmaterials.
(Savetheshippingboxandmaterialsintheeventtheunitmustbereshipped.)
3. Removethefantrayfromitsprotectiveplastic
bag.
4. Examinethefantraycarefully,checkingfordamage.Ifanydamageisnoted,donotinstallit.
ContactEnterasysNetworksforinstructions.
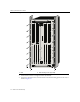
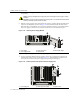
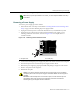
5. Unfastentwoscrewsonthebottombezel,asshowninFigure 3‐17.Pullthebezeldownoffthe
fantrayflangesandawayfromthechassis.
Caution: A fan tray is hot-swappable. Do not run the chassis for an extended interval without an
operating fan tray, however, because the chassis will soon overheat and be damaged.
Precaución: El sistema de ventilación se puede reemplazar cuando la unidad está encendida.
Sin embargo, no utilice el chasis durante largos períodos sin contar con un sistema de ventilación
porque podría sobrecalentarse y dañarse.
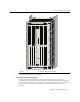
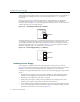
Note: Fan trays must be installed in the three lower fan tray slots. Optionally, for enhanced
redundancy, an additional three fan trays may be installed in the upper fan slots. Three or six fan
trays are the only supported configurations.
Note: If you are removing the top bezel, note that the fan tray flanges face up, so in removing the
bezel, lift it up and away from the chassis.