
Network Router User's Manual


Setting Up the Matrix X16-C Chassis
Matrix X16-C Chassis Installation Guide 3-7
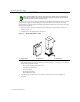
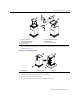
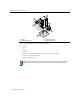
Figure 3-5 Installing Rack Support Brackets
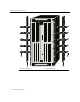
Installing Optional Mid-Mount Brackets
Youcanpurchaseanoptionalmid‐mountbracketkitforarackorcabinetwherethestandard
front‐chassisearattachmentisunusableduetospaceconcerns.Toinstall thebrackets,proceedas
follows:
1. Keepingtheabovenotesinmind,locatethepositiononthechassiswhereyouwillinstallthe
brackets.Thechassisrequires97.16centimeters(38.25inches)ofverticalspacing.
2. Aligntheholesinonebracketwiththoseinthechassis,asshowninFigure 3‐6,thenfastenit
tothechassisusing15ofthescrewssuppliedwiththebracketkit.
3. Installthesecondbracketasdescribedearlier,using
the15remainingscrews.
1 Rack 2 Rack support brackets (2) 3 Bracket screws (16)
1
2
3
1
2
3
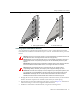
Warning: If the rack is not secured to the floor, it is recommended that you install the chassis in the
bottom half of the rack. This helps prevent the rack from being top heavy.
Advertencia: Si el rack no esta asegurado al piso, es recomendable que instales el chasis en la
parte de abajo del rack. Esto ayuda a prevenir que el rack este demasiado pesado en la parte
superior.
Warnhinweis: Falls das Rack nicht mit Schrauben am Boden gesichert wird, sollte das Chassis in
der unteren Hälfte des Racks installiert werden, um ein kippen des Racks zu vermeiden.
Warning: Before rack-mounting the device, ensure that the rack can support it without
compromising stability. Otherwise, personal injury and/or equipment damage may result.
Advertencia: Antes de montar el equipo en el rack, asegurarse que el rack puede soportar su peso
sin comprometer su propia estabilidad, de otra forma, daño personal o del equipo puede ocurrir.
Warnhinweis: Überzeugen Sie sich vor dem Einbau des Gerätes in das Rack von dessen
Stabilität, ansonsten könnten Personenschäden oder Schäden am Gerät die Folge sein.