
- Enterasys Network Adapter Hardware Installation Guide
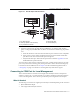
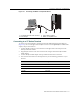
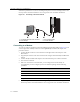
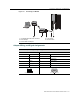

Table Of Contents
- Enterasys Matrix Hardware Installation Guide
- Notice
- Contents
- About This Guide
- Introduction
- Network Requirements
- Installation
- Troubleshooting
- Specifications
- Mode Switch Bank Settings and Optional Installations
- Index

Connecting to COM Port for Local Management
3-12 Installation
•RJ45‐to‐DB25femaleadapter
•RJ45‐to‐DB25maleadapter
WithaUTPstraight‐cablewithRJ45connectorsandRJ45‐to‐DB9adapter,youcanconnect
productsequippedwithanRJ45COMporttoanIBMorcompatiblePCrunningaVTseries
emulationsoftwarepackage.
WithaUTPstraight‐cableand
anoptionalRJ45‐to‐DB25femaleadapter,youcanconnectproducts
equippedwithanRJ45COMporttoaVTseriesterminalorVTtypeterminalsrunningemulation
programsfortheVTseries.
WithaUTPstraight‐cableandanoptionalRJ45‐to‐DB25maleadapter,youcanconnectproducts
equipped
withanRJ45COMporttoaHayescompatiblemodemthatsupports9600 baud.
Connecting to an IBM PC or Compatible Device
ToconnectanIBMPCorcompatibledevice,runningtheVTterminalemulation,toan
Enterasys NetworksmoduleCOMport(Figure 3‐5),proceedasfollows:
1. ConnecttheRJ45connectoratoneendoftheUTPstraight‐cabletothecommunicationsCOM
portontheEnterasys Networksmodule.(TheCOMportisalso
knownasaConsoleport.)
2. PlugtheRJ45connectorattheotherendoftheUTPstraight‐cableintoanoptionalRJ45‐to‐
DB9femaleadapter.
3. ConnecttheRJ45‐to‐DB9adaptertothecommunicationsportontheIBMPCorcompatible
device.
4. TurnonthePCandconfigureyourVTemulation
packagewiththefollowingparameters:
5. Whentheseparametersareset,theLocalManagementpasswordscreenwilldisplay.Referto
theappropriateEnterasysMatrixDFE‐Diamond/PlatinumSeriesConfigurationGuideforfurther
information.
Parameter Setting
Mode 7 Bit Control
Transmit Transmit=9600
Bits Parity 8 Bits, No Parity
Stop Bit 1 Stop Bit