
Component Guide

M250 Installation Planning
2013 Enphase Energy Inc. All rights reserved. July 2013
2
Installation Flow
Every Enphase installation should include these basic steps. Plan to complete these steps in the order
shown.
1. Register the System
First-time installers: go to https://enlighten.enphaseenergy.com/users/new and complete the form.
Your login credentials will be emailed to you.
Existing installers and those with new credentials: Log into the Enphase Enlighten
®
software.
Click “Add a New System” in the Installation Status widget.
2. Install the Envoy
Install the Envoy
®
Communications Gateway as directed by the installation manual.
Locate a dedicated AC outlet close to the load center. Place the Envoy so that its AC cord can
reach this outlet.
Plug the Envoy into the dedicated AC outlet and connect it to a broadband router. Wait for the
Envoy to display "+Web".
Allow 20 minutes in case a software upgrade is required. Do not unplug the Envoy during
software upgrade!
Set up the Grid Profile for your region, if required.
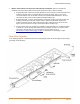
3. Install the PV Modules and the Enphase Microinverters
Install the PV modules and microinverters as directed by the installation manuals.
Use the ArrayGun to scan the microinverters. For more information, go to
http://enphase.com/products/arraygun.
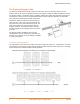
As an alternative, you can manually build the map: Peel the removable serial number label from
each microinverter and affix it to the respective location on the map.
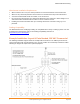
4. Complete the Set Up
Ensure at least 3 level bars and the correct number of microinverters are showing on the Envoy
LCD screen.
Once the Envoy has detected the microinverters, log in to Enlighten to use the Array Builder. For
tips on how to use it, visit http://enphase.com/support/videos.