
Installation Manual

Detect Devices
Use one of the following methods to detect devices (Enphase Microin-
verters).
Method A // Provision devices with Installer Toolkit
Use the Installer Toolkit mobile app to congure the IQ Commercial
Envoy with the serial numbers of the installed devices.
A ) Launch the Installer Toolkit app and tap View Systems.
B ) Select the system you are working with, or tap [+] to add a new
system.
C ) Connect to the IQ Commercial Envoy with your mobile device (smart
phone or tablet) to the IQ Commercial Envoy. The AP Mode LED
lights solid green when the network is available.
•
On the Envoy, if the AP Mode LED is not lit, press the AP Mode
button.
•
On your mobile device, go to Settings and join the Wi-Fi network
“Envoy_nnnnnn” (where “nnnnnn” represents the nal six digits of
the IQ Commercial Envoy serial number).
D ) If the serial number for the Envoy you are installing is not displayed
on the System Overview screen, tap the [+] next to the word “En-
voys”. When the app displays the serial number of the Envoy, tap it
to add it to the system.
E ) Following the on-screen instructions to create the arrays and scan
the serial numbers from the installation map.
F ) Tap the Connect button. This provisions the scanned devices on the
Envoy.
G ) When prompted, conrm the number of devices that you installed.
H ) If your system requires a region-specic grid prole, select and
apply a grid prole to the devices. (Systems in Hawaii require you to
set a prole.)
The Device Communications LED lights solid green if all the provi-
sioned devices are communicating or solid amber if any devices are not
communicating.
Method B // Discover devices with Installer Toolkit
Use the Installer Toolkit mobile app to set the number of devices the IQ
Commercial Envoy should search for on the power line.
A ) Connect to the IQ Commercial Envoy with your mobile device (smart
phone or tablet) to the IQ Commercial Envoy. The AP Mode LED
lights solid green when the network is available.
•
On the Envoy, if the AP Mode LED is not lit, press the AP Mode
button.
•
On your mobile device, go to Settings and join the Wi-Fi network
“Envoy_nnnnnn” (where “nnnnnn” represents the nal six digits of
the IQ Commercial Envoy serial number).
B ) Launch Installer Toolkit and tap Connect to an Envoy.
C ) When prompted, enter the number of devices that you installed.
D ) If your system requires a region-specic grid prole, select and
apply a grid prole to the devices. (Systems in Hawaii require you to
set a prole.)
E ) When prompted to start a device scan, tap OK.
The Device Communications LED ashes green while scanning,
solid green when all the devices you installed are communicating, or
solid amber if any devices are not communicating.
With both methods
If the Device Communications LED remains solid amber, see
Troubleshooting
b
.
Verify Conguration and Enable the Meters
While still connected to the IQ Commercial Envoy with Installer Toolkit,
check the Overview screen for the following:
A ) Conrm that the expected number of devices are detected and com-
municating.
B ) Check that the new prole is set on all the devices. Setting the prole
may take up to 5 minutes for a typical system.
C ) Tap the Meters button.
D ) Tap Production Meter and follow the on-screen instructions to enable
the Production Meter.
E ) If you installed consumption metering CT(s), tap Consumption Meter
and follow the on-screen instructions to enable the Consumption
Meter.
F ) Return to the Overview screen and verify the meter reading(s).
If you used Installer Toolkit to detect devices, the Power Production LED
lights solid green when all expected microinverters are producing
power. If you did not use Installer Toolkit, it lights solid green if all
communicating microinverters are producing power. It ashes green
when devices are upgrading. Check Installer Toolkit for production
status details. If the Power Production LED remains solid amber, see
Troubleshooting
c
.
Connect to Enlighten
This section describes using the IQ Commercial Envoy integrated Wi-Fi or
the Mobile Connect modem. For information about using Ethernet and/
or PLC bridges, refer to the Enphase IQ Commercial Envoy Installation and
Operation Manual at: enphase.com/support.
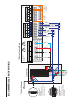
Method A // Integrated Wi-Fi
Requires a wireless router with an Internet connection.
A ) On the Envoy, verify that no Ethernet cable is plugged into the RJ45
port.
B ) If the router supports WPS, press and hold the WPS button on the
wireless router for a few seconds. On most routers, a WPS indicator
begins ashing.
C ) If you are using the Installer Toolkit mobile app, tap the Network
button, tap Wi-Fi, and then tap your network from the list of available
networks. If the wireless router does not support WPS, you may be
prompted to enter a password.
The Network Communications
LED begins ashing green.
Within three minutes the Network
Communications LED lights solid
green, indicating a successful
connection to Enlighten. If the
Network Communications LED
remains off or lights solid amber, see Troubleshooting
d
.
Method B // Enphase Mobile Connect Modem
[Order CELLMODEM-01 (3G) or CELLMODEM-03 (4G) separately]
A ) Connect the antenna(s) to the connector(s) and mount the modem as
described in the Enphase Mobile Connect Installation Guide.
B ) First, connect the USB cable to the IQ Commercial Envoy and then
connect the mini-USB connector to the modem. If receiving power
from the IQ Commercial Envoy, the modem power LED lights.
Within three minutes the Network Communica-
tions LED lights solid green, indicating a suc-
cessful connection to Enlighten. If the Network
Communications LED remains off or lights solid
amber, see Troubleshooting in the Enphase Mo-
bile Connect Installation Guide.
4
6
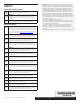
wireless router
IQ Commercial Envoy
Enphase Mobile
Connect
modem
IQ Commercial Envoy
5
INSTALLATION — Part 2
Once the update is nished and the PV system is installed, the Envoy is
ready for Installation Part 2. You must complete Installation Part 2 after
installing the PV system.