
Owner`s manual


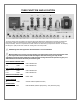

8. TREBLE – Passive High frequency equalization.
9. GAIN – Sets the overdrive level of the PLEX channel.
10. CHANNEL SELECT - The CHANNEL SELECT switch controls whether the PLEX or the ROD channel is
engaged. If the CHANNEL SELECT switch is set to the LEFT, the ROD channel is engaged and the
YELLOW LED above the ROD channel GAIN control will be lit. If the CHANNEL SELECT switch is set to
the RIGHT, the PLEX channel is engaged and the GREEN LED above the PLEX channel GAIN control
will be lit. PLEASE NOTE – when the provided footswitch is connected to the amp, the CHANNEL
SELECT switch is not operational – the function of the switch is controlled by the footswitch instead,
including whether the GREEN or YELLOW LEDs light or not.
ROD CHANNEL SECTION
11. SATURATION – This saturation switch sets the gain style for the ROD channel when the SOLO master
volume is engaged. It is a 3-way switch and the center position is OFF, meaning no additional gain and
compression is added. If the switch is set to the RIGHT position, a subtle amount of gain and
compression is added. If the switch is set to the LEFT position, a higher level of gain and compression is
added. PLEASE NOTE – in the ROD channel, you will notice a significant volume reduction when the
SATURATION switch is set LEFT or RIGHT as compared to the OFF center position. This is normal and
no cause for concern. You’ll set this switch and adjust the SOLO master to get the volume you want.
Also note that the effect of the SATURATION switch is much more noticeable at louder overall volume
settings. We usually set this switch to the left for a higher gain, singing lead tone for the ROD channel
when the SOLO master volume is engaged.
12. SOLO – This is the SOLO master volume control for the ROD channel. It is only engaged when the ROD
channel is engaged AND the SOLO switch (see below) is set to the LEFT (or the footswitch is connected
and the SOLO footswitch is engaged) with the RED LED next to it lit. It is intended as a solo boost for
the ROD channel and overrides the regular channel master when engaged. You can set the associated
SATURATION switch for a lead tone and set SOLO so that it is a boost in volume over the regular
channel master. As you read in the previous section you can use the channel masters along with the
OVERALL MASTER on the back of the amp to get the overall sound you want at the volume that is
appropriate for the room you are playing in. We recommend that you set the overall volume of the amp
using the OVERALL MASTER on the back of the amp and keep the solo and channel masters fairly high
(above halfway up or 12 o’clock) and use them to balance the channels and solo volumes as needed. Of
course, you can also set the OVERALL MASTER all the way up and set your volumes with the channel
and solo masters, it is really up to you. If the OVERALL MASTER is all the way up, it is completely out of
the circuit.
13. SATURATION – This saturation switch sets the gain style for the ROD channel when the MASTER
master volume is engaged. It is a 3-way switch and the center position is OFF, meaning no additional
gain and compression is added. If the switch is set to the RIGHT position, a subtle amount of gain and
compression is added. If the switch is set to the LEFT position, a higher level of gain and compression is
added. PLEASE NOTE – in the ROD channel, you will notice a significant volume reduction when the
SATURATION switch is set LEFT or RIGHT as compared to the OFF center position. This is normal and
no cause for concern. You’ll set this switch and adjust the MASTER master to get the volume you want.
Also note that the effect of the SATURATION switch is much more noticeable at louder overall volume
settings. We usually set this switch OFF or to the right for a rhythm tone for the ROD channel when the
MASTER master volume is engaged.