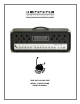
TUBE GUITAR AMPLIFIER MODEL: CHERRY BOMB OWNER’S MANUAL
WELCOME TO HENNING AMPLIFICATION Congratulations and thank you for choosing the Henning Cherry Bomb Guitar Amplifier! At Henning Amplification, our mission is to design and build the finest tube guitar amplifiers for discerning tone freaks. Hand built in the USA using the highest quality components and materials, our amplifiers sound killer, look cool and are as durable and road ready as anything currently on the market.
IMPORTANT SAFETY INSTRUCTIONS This symbol warns the user of dangerous voltage levels localized within the enclosure. unit. This symbol advises the user to read all accompanying literature for safe operation of the Read, retain, and follow all instructions. Heed all warnings. Only connect the power supply cord to an earth grounded AC receptacle in accordance with the voltage and frequency rating that you specified when ordering the amp.
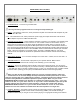
CHERRY BOMB FUNCTIONS FRONT PANEL, LEFT TO RIGHT 1. GUITAR INPUT – Plug your guitar, pedalboard or stompbox in here PLEX CHANNEL SECTION 2. SATURATION – This saturation switch sets the gain style for the PLEX channel. It is a 3-way switch and the center position is OFF, meaning no additional gain and compression is added. If the switch is set to the RIGHT position, a subtle amount of gain and compression is added. If the switch is set to the LEFT position, a higher level of gain and compression is added.
8. TREBLE – Passive High frequency equalization. 9. GAIN – Sets the overdrive level of the PLEX channel. 10. CHANNEL SELECT - The CHANNEL SELECT switch controls whether the PLEX or the ROD channel is engaged. If the CHANNEL SELECT switch is set to the LEFT, the ROD channel is engaged and the YELLOW LED above the ROD channel GAIN control will be lit. If the CHANNEL SELECT switch is set to the RIGHT, the PLEX channel is engaged and the GREEN LED above the PLEX channel GAIN control will be lit.
14. MASTER – This is the MASTER master volume control for the ROD channel. It is only engaged when the ROD channel is engaged AND the SOLO switch (see below) is set to the Right (or the footswitch is connected and the SOLO footswitch is NOT engaged) with the RED LED next to it NOT lit. It is intended as the main channel master volume for the ROD channel and overrides the regular channel master when engaged.
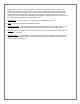
REAR PANEL, LEFT TO RIGHT 1. AC MAINS INPUT – Connect to a grounded outlet. Use only the factory supplied cord set or a UL approved equivalent type. 2. MAINS – This holds the mains fuse, which protects the amplifier from electrical faults. Replace only with a 4 AMP SLO BLO fuse. 3. B+ - This holds the B+ fuse, which protects the power supply and output transformer from electrical faults. Replace only with a 1 AMP FAST BLO fuse. 4.
master all the way down to “bedroom volumes’. Crank the channel masters up and turn the overall master down to the volume level you’d like to play at and you’ll see that the overall master also adds some perceived gain and compression to the tone. Experiment with balancing different settings of the channel masters and overall master to get the tone you’d like at the right volume for the room you’re playing in.
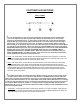
FOOTSWITCH FUNCTIONS LEFT TO RIGHT To use the footswitch, it must be connected between the footswitch and the amplifier back panel. Your amplifier came with a special cable that has an XLR connector on one end that connects to the footswitch and 3 ¼” phone plugs on the other end. To connect the footswitch, align the XLR type plug properly with the foot controller’s connector and then push the plug in until it snaps - you won’t be able to pull it out.
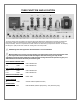
TUBE FUNCTION AND LOCATION The picture above shows the locations of each tube along with alphanumeric designations used below to describe the tubes. Below, tubes are described by the location alphanumeric, tube type and the specific tube provided in your Cherry Bomb amp. Feel free to experiment with other tubes of the same tube type required for each slot. For example, the Winged "C" (SED) EL34 Power Tubes also sound great in the Cherry Bomb.
SAMPLE SETTING To help you get acquainted with your Henning Cherry Bomb, we have created this sample setting of all the controls so that you have a great starting point for tweaking the amp to YOUR tone. ALWAYS start with the OVERALL MASTER set fully counterclockwise (the off position) and adjust it slowly up until you reach the appropriate volume for the room you are playing in, even with these sample settings.
LIMITED WARRANTY Subject to the obligations and exclusions found below, this product is warranted by Henning Amplification, LLC against manufacturing defects in materials and workmanship for the period of Five (5) Years from the date of purchase, with the exception of the tubes, fuses and speakers where applicable, which carry a 90 day warranty. The warranty period commences on the date of purchase by the original user.