
Operator`s manual


leads. Though these application areas overlap somewhat, and are
voiced differently. features an additional triode, making it a tad more
dynamic and eliciting a slightly different frequency response.
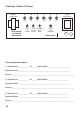
The tone controls in the four channels respond differently, so I suggest you perform an
initial sound-check by setting the knobs between 11 and 3 o'clock and auditioning the
results. This amp employs passive EQ. Note that its range is narrower than a
comparable active EQ. I opted for passive tone controls because the passive design is
better suited to tube tone.
On this amp, the option affects all preamp channels. It lets you conjure two
sounds with markedly different voicings and gain levels for each channel. The
difference between the two is greatest in and . I also voiced
and differently. Channel 3's midrange is scooped, and its hair-trigger response to
your string attack is fast and true.
, in contrast, packs more mids, with a slightly less accurate response to your
attack. demands more precise playing technique, while is easier
to handle.
Channel 1 Channel 2
Channel 2
Hi Gain
Channels 3 4 Channels 3
4
Channel 4
Channel 4 Channel 3
All these options harbor vast and musically meaningful sonic potential. I'm confident
that the and knobs, tone controls and sound-shaping buttons will let
you conjure all the sounds you have in mind and that you'll discover a world of tones
while you're tweaking.
Because it is chock full of tone-tweaking tools, this amp is sure to surprise you time and
again with new sonic variants. However, there's no need to panic in face of its
sophisticated functionality. At ENGL, ease of use is paramount. We design all our amps
so that players can dial in great sounds from the start - without hours spent
researching the manual and struggling with settings. Despite being so easy to use, the
ENGL InVader Amp puts into the hands of the innovative, creative guitarist an all but
inexhaustible bonanza of sound-shaping resources. And I am convinced that guitarists
with more traditional leanings are equally well-served with this amp's smorgasbord of
tasty tube tone!
The advantage of a Noise Gate that is installed in and matched to the amp is that it lets
you fine-tune its threshold with extreme precision, thereby separating the useful,
musical signal from useless background noise. Indeed, this was designed to
address the signal the most beneficial spot in the signal chain - the preamp - to make it
more effective. First and foremost, it is designed to suppress ambient noise such as
hissing and humming during breaks when the Preamp is in Hi Gain mode. For this
reason, I tuned its threshold (that's the level at which the gate triggers) range to suit
this amp mode, and then adjusted it for Lo Gain ( deactivated) configurations.
To get acquainted with how the works, I suggest you start by setting the
Threshold knob to the far left ( opens at low signal levels) and slowly twist it
clockwise to gradually raise the gate's trigger threshold. When the knob arrives at the
far right position, the will not trigger until the signal reaches a very high
level. This means that the preamp must amplify the guitar signal considerably to open
up (or deactivate) the . In practice, your best bet for suppressing loud noise
when running channels 2, 3, and 4 at high Gain levels is to set the Threshold knob
higher than 12 o'clock. If you're doing the low-gain thing in Lo Gain mode, dial in a
Bright Hi Gain
Noise Gate
Hi Gain
Noise Gate
Noise Gate
Noise Gate
Noise Gate
A few comments on the Noise Gate:
22