
Operator`s manual


to the right to avoid damaging it. If the foot board you are using is designed to handle
phantom power, consult its operating manual to learn how it is wired (that is, which
pins carry its power supply) and what its voltage and current specifications are. If the
voltage and current specifications and wiring match, you may set the switch to the left
to power this foot board via the MIDI cable.
Note that a MIDI foot board may not draw more than 200
milliamperes of current if you want to power it via this port. You must also check and
verify if this MIDI foot board is able to handle 11 volts of alternating current (AC)! If
you are in any doubt, be sure to consult a specialist, meaning an amp technician or
electronics engineer who earns a living with a screwdriver!
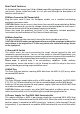
Use this set of encoding buttons (1, 2, 3, 4 and 5) to assign the MIDI channel. This tells
the amp's MIDI system over which channel it will receive MIDI program change
commands. Your choices are the standard 16 MIDI channels (numbered from 00 to
15), as well as OMNI mode (whereby all MIDI data is received regardless of the MIDI
send channel). The encoding button settings for a specific channel and OMNI mode
are listed in the following table.
Encoding button number 6 lets you program the amp so that it is muted when it
receives a MIDI controller #7 command. When this command has a value of 0 (and less
than and equal to 5), the amp's master volume is muted ( active). At values
greater than or equal to 5, the amp is back on line at the volume level determined by
the currently active Master knob ( deactivated).
Setting the encoding button 6 to ON enables the MIDI controller #7
access capability.
Setting the encoding button 6 to OFF disables the MIDI controller #7
access capability.
You cannot deactivate to activate the amp via an appropriate MIDI
controller #7 command when is engaged to switch the power amp off.
You must first flip the Standby switch.
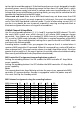
MIDI-channel: S 1 S 2 S 3 S 4 S5 S6
OMNI OFF XX XX XX XX XX
CH 1 ON OFF OFF OFF OFF XX
CH 2 ON OFF OFF OFF ON XX
CH 3 ON OFF OFF ON OFF XX
CH 4 ON OFF OFF ON ON XX
CH 5 ON OFF ON OFF OFF XX
CH 6 ON OFF ON OFF ON XX
CH 7 ON OFF ON ON OFF XX
CH 8 ON OFF ON ON ON XX
Please read and heed:
MIDI controller #7 assignment to encoding button number 6:
Note:
MIDI channel assignment using the encoding buttons:
45 Midi Channel & Amp Mute
Amp Mute
Amp Mute
Amp Mute
Amp Mute
Amp Mute
Standby
17