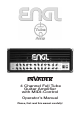
INVADER 4 Channel Full Tube Guitar Amplifier with MIDI-Control Operator´s Manual Please, first read this manual carefully!
Tube Amp Technology
Table of Contents Introduction Features and Functionality at a Glance Contents page: 4 5 6 Front Panel Features: Bright Channel 1: Gain 1, Bass, Middle, Treble, Volume 1, CH 1 Channel 2: Gain 2, Bass, Middle, Treble, Volume 2, CH 2 Power Amp EQ: Presence A/B, Depth Boost FX Loop I/II, Noise Gate Input, Hi Gain Channel 3: Gain 3, Bass, Middle, Treble, Volume 3, CH 3 Channel 4: Gain 4, Bass, Middle, Treble, Volume 4, CH 4 Power Amp section: Master A/B Write/Copy, Amp Mute Stand By, Power 6 6, 7 7, 8 8 9 10
Congratulations on your choice! With the InVader tube-powered head, you now own an extraordinarily versatile guitar amp. Featuring a state-of-the-art design and packing a powerful punch, it delivers both contemporary and traditional vintage tones in the finest tube flavors and quality! This sophisticated guitar amp marries the unrivalled tone of all-tube technology to the awesome sound-shaping might of control features powered by state-of-the-art microchip circuitry.
. an ultra-advanced tone-generating machine that will give you years of playing pleasure and value to boot. Features and Functionality at a Glance -> Four basic channels: Channel 1, Channel 2, Channel 3 and Channel 4 with separate Gain and Volume knobs. -> Two Gain variants for each of the basic channels: The Hi Gain feature lets you activate directly two different gain settings for every channel. -> Four voicing sections: one EQ for each Channel featuring Bass, Middle and Treble.
Contents: 1. ENGL InVader Tube Amp Head; 2. mains cord; 3. this manual; 4. a pamphlet entitled Instructions for the Prevention of Fire, Electrical Shock and Injury. Front Panel Features At the back of the manual, you'll find fold-out diagrams of the front and rear panels.
ups such as humbucking or active jobs, dial in settings between 9 and 1 o'clock and activate Hi Gain. 3 Bass This is the preamp voicing section's passive low-frequency EQ for Channel 1. 4 Middle This is the preamp voicing section's passive midrange frequency EQ for Channel 1. 5 Treble This is the preamp voicing section's passive high-frequency EQ for Channel 1.
feedback. Avoid feedback squeals; they can lead to hearing loss and damage speakers! At higher volumes, back off the Gain, Treble and Presence levels in order to prevent unchecked feedback! 9 Bass This is the preamp voicing section's passive low-frequency EQ for Channel 2. 10 Middle This is the preamp voicing section's passive midrange frequency EQ for Channel 2. 11 Treble This is the preamp voicing section's passive high-frequency EQ for Channel 2.
16 FX LOOP I/II This button switches to and fro between FX Loop I and FX Loop II. The red LED above the button lights up to indicate FX Loop II is on. You can also select loops via MIDI program change or the ENGL Custom Z-9 Footswitch.
entirely possible for this humming and other noise to rise to a level that deactivates the Noise Gate and therefore becomes audible. My advice is to stay as far away from transformers and power units as space allows. 18 Input ¼" unbalanced input jack. Plug your guitar in here using a shielded cord. A tip from the designer: Depending on the type of cord and its shielding, you may occasionally encounter interference from sources such as radio stations or powerful magnetic fields.
22 Middle This is the preamp voicing section's passive midrange EQ for Channel 3. 23 Treble This is the preamp voicing section's passive high-frequency EQ for Channel 3. A tip from the designer: To help you get acquainted with the amp's fundamental sounds, I recommend that you set all tone controls to about the center or 12 o'clock position.
28 Middle This is the preamp voicing section's passive midrange EQ for Channel 4. 29 Treble This is the preamp voicing section's passive high-frequency EQ for Channel 4. A tip from the designer: To help you get acquainted with the amp's fundamental sounds, I recommend that you set all tone controls to or slightly higher than the center or 12 o'clock position.
34 Master A/B Switches back and forth between the Master A and Master B knobs. The LEDs next to the knobs light up to indicate which Master knob is active the red LED for Master A, the green LED for Master B. MASTER A/B can also be switched via MIDI program change or the ENGL Custom Z-9 Footswitch. A tip from the designer: Here's a nifty option: Use Master A and B to set two different power amp levels and access these as you wish in tandem with the preamp's eight channel and Gain combinations.
IMPORTANT note; please read and heed: MIDI preset 1 activates when the amp is powered up. If you want to edit and/or store other MIDI presets, you must connect a MIDI foot board or another MIDI send device to the MIDI In port (43) and use this outboard device to select the desired MIDI preset on the amp. More good-to-know info: Note that the Status LED also indicates the status of components unrelated to Write and Copy. The microcontroller runs a short system check after you switch the amp on.
Standby is set to On (that is, the power amp is active) if you want this preset to disable Amp Mute and enable the power amp so the speaker renders your sound. If the Standby switch is set to 0 during programming, the amp will be muted when you select this MIDI presets precisely because the Amp Mute function was enabled during programming. Therefore the power amp will not boost the signal and the sound will not be audible over the speaker.
Rear Panel Features At the back of the manual you'll find a folded page offering diagrams of the front and rear panels. Please unfold and refer to it as you read through the descriptions of features and functions! 39 Mains Connector (AC Power Inlet) Plug the mains cord in here. For European models, use a standard non-heating equipment connector cable.
to the right to avoid damaging it. If the foot board you are using is designed to handle phantom power, consult its operating manual to learn how it is wired (that is, which pins carry its power supply) and what its voltage and current specifications are. If the voltage and current specifications and wiring match, you may set the switch to the left to power this foot board via the MIDI cable.
CH 9 CH 10 CH 11 CH 12 CH 13 CH 14 CH 15 CH 16 ON ON ON ON ON ON ON ON ON ON ON ON ON ON ON ON OFF OFF OFF OFF ON ON ON ON OFF OFF ON ON OFF OFF ON ON OFF ON OFF ON OFF ON OFF ON XX XX XX XX XX XX XX XX A tip from the designer: As the table indicates, encoding button 1 switches between Poly and OMNI mode. Bear this in mind for practical applications, because this is a fast way to go from a preset Poly channel to OMNI mode and vice versa.
other activates Channel 1 or 2 (-> the top channels) and Channels 3 or 4 (-> the bottom channels). The onboard channel switching facility, is disabled when you plug a footswitch into this jack. The MIDI In port (43) and the Z-9 Port (46) are both disabled when a plug is connected to this jack. Note also: A footswitch may be equipped with LEDs indicating the given switching status. Each of the two switches is provided with 15 milliamperes current, which suffices to power a standard LED.
shortest possible shielded cord equipped with 1/4" plugs. Activate and deactivate it via the FX Loop I/II (16) button, which switches between these two loops. In the signal path, FX Loop II is located post preamp and pre the two power amp Master knobs. 53 FX Loop II Return Connect this FX Loop II input to a signal processor's output/send jack using the shortest possible shielded cord equipped with 1/4" plugs.
sufficient load, otherwise you may damage or destroy it! An electronic surveillance system constantly monitors if a plug is inserted into the speaker outputs 4 ohms (57, 58), 8 ohms (59, 60) and 16 ohms (61). If a plug is not inserted into one of these 5 jacks, the power amp is disabled and the Status LED flashes in a distinctive pattern to alert you to this. However, the system cannot check if a speaker is actually connected to the other end of the cord. That's your job.
leads. Though these application areas overlap somewhat, Channel 1 and Channel 2 are voiced differently. Channel 2 features an additional triode, making it a tad more dynamic and eliciting a slightly different frequency response. The tone controls in the four channels respond differently, so I suggest you perform an initial sound-check by setting the knobs between 11 and 3 o'clock and auditioning the results. This amp employs passive EQ. Note that its range is narrower than a comparable active EQ.
lower Threshold setting (below 12 o'clock) to prevent the gate from throttling notes (that is, the musically useful sounds) as they decay, particularly if you like to work the guitar's volume knob. On the subject of effect loops: An interesting configuration option is to run the InVader's internal preamp with or without an effects device. In this variant, FX Loop I serves as a nifty, MIDI-controlled hardware bypass.
Copying: 1. Select the desired MIDI preset using a MIDI foot board connected to the amp's MIDI In (43) port. This is the preset that you want to copy, which is why in geek-speak it is called the "source." 2. Press the Copy/Write button briefly. It is essential that during this routine you do not change the settings of programmable functions in the selected source preset. That Status LED lights up continuously to indicate that Copy is activated. 3.
all possible, avoid operating the amp at temperatures far higher than 30°C for longer periods. Running the amp at mains voltages exceeding the nominal mains input voltage over longer periods can also shorten component life. Replace tubes with selected tubes that satisfy ENGL selection criteria to forestall microphonic properties, undesirable noise and unbalanced power amp signals.
The Status LED above the Write/Copy (35) button indicates the following conditions: 1. Memory error (possibly a defect in the EEPROM); Indication: LED flashes in five short bursts; What to do: Press the Write/Copy button (this resets the LED, but does not solve the problem). 2. No speaker connected; Indication: The LED flashes in a distinctive pattern, illuminating briefly at regular intervals; What to do: Connect a speaker. 3.
Troubleshooting Programmable features fail to respond when you change settings: -> Powerful static charges, strong radio signals or mains voltage spikes can affect microcontroller-driven systems, setting them to an undefined status (commonly called a hung chip). In this event, your only choice is to reset the system. Simply switch the amp off and on again.
-> You may be looking at a faulty tube or another defect. In this case, be sure to take the preamp to an authorized, professional service center. The speaker is emitting loud humming noises: -> Is the Ground Lift switch (41) set to Ground? If you are operating the amp without other grounded gear (power amp, effect devices) connected, this switch must be set to the Ground position; otherwise, it's goodbye silence, hello humming! In this case, the amp will hum even without a guitar connected.
Technical Data Output power: Input sensitivity Input: Effect Return: Output level SEND, level range: Pre Out: Line Out: Power consumption: Fuses: external: at 230/240 mains voltage at 100/115/120 mains voltage internal: at 230/240 mains voltage at 100/115/120 mains voltage Important: Tubes: V1, V2, V3, V4, V5, V6: V7: V8, V9: V10: Consult Tube Map to view tube array Logic control system: Processor, software: Memory: System interfaces: MIDI: approx.
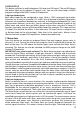
Tube Map, InVader 150 Amp: Output Transformer E640 chassis as viewed from above LED LED LED LED LED LED V1 V2 V3 V4 V5 V6 V7 V8 V9 Input Lead FX buffer & driver & & P.A. 2.stage 3.stage driver Power transformer V 10 phase shift converter Front panel Tube replacement report: 1.
Wiring of Principal Connectors MIDI IN (43), DIN connector Pin 3 - N.C. Pin 1 - power supply approx.11 volts AC * Pin 5 - MIDI-data wire Pin 4 - MIDI-data wire Pin 2 power supply page: 16 approx.11 volts AC * *: AC voltage is routed to pin 1 and 2 only when button 44 is set to ENGL MIDI Footcontroller.
Options for controlling the ENGL InVader amp remotely: CAUTION ! REPLACE FUSE ONLY WITH SAME TYPE AND RATING ! ! R DO NOT OPEN ! RISK OF ELECTRIC SHOCK ! DO NOT EXPOSE THIS EQUIPMENT TO RAIN OR MOISTURE ! Tube Amp Noise Gate FX Loop I 150 W All-tube Guitar Head Amp FX Loop II MADE IN GERMANY 1 2 3 4 5 6 Ground Ground Lift Switch Midi In Midi Channel Midi Foot& Controller Amp Mute Serial Amp Channel: Control Port Up / Down CAUTION: 1-2 / 3-4 Connect Custom Footswitch Z-9 Only! A 5 6 R Tub
Noting Settings: Gain 1 Tube Bass Middle Treble Volume 1 Gain 2 Bass Middle Treble Volume 2 CH 1 Bright Presence Depth Punch Master A Master B FX Loop I / II CH 2 Noise Gate INVADER 150 Amp Gain 3 Input Bass Middle Treble Volume 3 Hi Gain Gain 4 Bass Middle Treble Volume 4 Master Write / A/B Copy CH 4 CH 3 Amp Mute Stand By Power Sound title: _ _ _ _ _ _ _ _ _ _ _ _ _ _ _ _ _ _ _ _ _ _ Preset: _ _ _ _ _ _ _ _ _ comment: _ _ _ _ _ _ _ _ _ _ _ _ _ _ _ _ _ _ _ _ _ _ _ _ _
Configuration table for assigning the ENGL InVader's sound-shaping and special functions to the Z-9 Custom Footswitch's Functions 1 and 2 : Button Function 1 Function 1 Function 1 Function 1 Function 1 Function 1 Function 1 Function 1 Function 2 Function 2 Function 2 Function 2 Function 2 Function 2 Function 2 Function 2 Functions InVader Master A/B no no no no Hi Gain no Noise Gate no no no Amp Mute no Bright FX Loop I/II no Setup 1: Channel 1 1: Channel 2 1: Channel 3 1: Channel 4 1: Channel 1 1: Channe
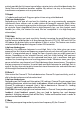
Page: <-- 6 --> <---------------------------------- 7 -----------------------------------> <-------------------------------------------- 8 -------------------------------------------> <- 9 -> 1 2 3 4 5 6 8 9 10 11 12 16 17 Gain 1 Bass Middle Treble Volume 1 Gain 2 Bass Middle Treble Volume 2 7 CH 1 Bright Tube 13 14 15 Presence Depth Punch FX Loop I / II CH 2 INVADER 150 Noise Gate Amp Gain 3 Input Bass Middle Treble Volume 3 Gain 4 Hi Gain Bass Middle Trebl
R Tube Amp Technology Gerätebau GmbH Germany Internet: http://www.engl-amps.