
Specifications


routegroups in the ROUTE GROUP MANAGEMENT page. Go to Service -> IP PBX Service, and click
RELOAD to activate changes.
4.5.1 Add a Route Group
1. Type a route group name and click ADD.
2. Click the route group in Group ID to see the settings.
3. Enter settings shown in
Table 4.5, and click BACK.
The newly added route group should be displayed in the Group ID.
4.5.2 Edit a Route Group
1. Click a route group name in Group ID.
2. Edit settings shown in
Table 4.5.
3. Click SET, if there is any update in the Description box.
4. Click BACK to see the updated information.
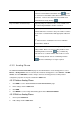
4.5.3 Delete a Route Group
1. Select a Group ID.
2. Click DEL to remove the route group from the Group ID.
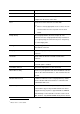
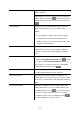
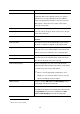
Table 4.5 Routegroup Configuration Settings
Field Description
Group ID A unique ID containing alphabets, numbers, and underscore
only without spaces; 32 characters maximum.
Description Arbitrary description information.
Associated Routes
8
Select routes belonged to this routegroup. Click ADD/DEL
button to add or remove a route to or from the routegroup.
The right box lists current selected routes. Note the order of
the selected routes is important since it decides which route
would be matched first for an outgoing call.
) If there is no appropriate routes to select initially, one
8
Please refer to 4.4 for details.
32