
Specifications

4.2.1 Add a User Group
1. Enter a usergroup name beside the ADD button, and then click ADD.
2. The name will show in Group ID.
3. Click the name in Group ID to view the edit page.
4. Enter settings shown in
Table 4.2.
5. Click SET to save the settings, and click BACK to return to the USERGROUP MANAGEMENT
page.
Now, you can see the newly added usergroup displayed in the Group ID.
4.2.2 Edit a User Group
1. Click a usergroup name in the Group ID.
2. Edit settings shown in
Table 4.2.
3. Click SET.
4.2.3 Delete a User Group
1. Select a Group ID.
2. Click DEL to remove the usergroup from the Group ID.
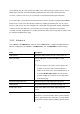
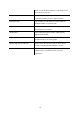
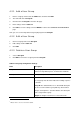
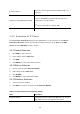
Table 4.2 Usergroup Configuration Settings
Field Description
Group ID A unique group name containing alphabets, numbers, and
underscore only without spaces; 32 characters maximum.
Description Arbitrary description information.
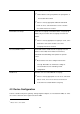
Associated Trunks
4
Select outbound SIP trunks and PSTN trunks accessible by
this usergroup. Note the order matters the hunting sequence
in run-time.
Group ID: The default number is “0”. A trunk with Group ID
“0” does not form a balance group with any other trunks in
Group 0. If Group ID is 1~9, trunks with the same Group ID
form a usage balance group.
Weight: the weight of a trunk to be selected in a trunk
4
Please refer to 4.6, 4.7, and 4.8 for details.
21