1b/g Wireless SOHO Router User’s Manual Version: 1.
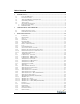
Table of Contents 1 INTRODUCTION................................................................................................................................5 1.1 1.2 1.3 1.4 1.5 1.6 FEATURES & BENEFITS ...........................................................................................................5 PACKAGE CONTENTS...............................................................................................................6 WIRELESS SOHO ROUTER DESCRIPTION .................................
.5.6 DMZ .....................................................................................................................................44 APPENDIX A – SPECIFICATIONS..........................................................................................................45 APPENDIX B – FCC INTERFERENCE STATEMENT.........................................................................
Revision History Version Date Notes 1.0 1.1 1.
1 Introduction The Wireless SOHO Router operates seamlessly in the 2.4 GHz frequency spectrum supporting the 802.11b (2.4GHz, 11Mbps) and the newer, faster 802.11g (2.4GHz, 54Mbpswireless standard. High output power and high sensitivity can extend range and coverage to reduce the roaming between APs to get more stability wireless connection. It also can reduce the expense of equipment in the same environment.
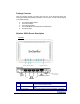
Package Contents Open the package carefully, and make sure that none of the items listed below are missing. Do not discard the packing materials, in case of return; the unit must be shipped in its original package.
Connection / Activity LED WAN LED WLAN LED Power LED socket on the wall, and the DC inlet into the DC connector. This LED will light up once an Ethernet cable is connected to one of the LAN ports or the WAN port. This LED will light up once an Ethernet cable is connected to WAN (Internet) port. This LED will light up once the RF (wireless LAN) feature is enabled This LED will light up once the power cable is connected to the DC connector.
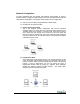
Network Configuration To better understand how the wireless LAN products work together to create a wireless network, it might be helpful to depict a few of the possible wireless LAN PC card network configurations. The wireless LAN products can be configured as: a) Ad-hoc (or peer-to-peer) for departmental or SOHO LANs. b) Infrastructure for enterprise LANs.
2 Understanding the Hardware Hardware Installation 1. Place the unit in an appropriate location after conducting a site survey. 2. Plug one end of the Ethernet cable into the LAN port of the device and another end into your PC/Notebook. 3. Plug one end of another Ethernet cable to WAN port of the device and the other end into you cable/DSL modem (Internet) 4. Insert the DC-inlet of the power adapter into the port labeled “DC-IN” and the other end into the power socket on the wall.
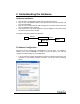
2. Select Internet Protocol (TCP/IP) and then click on the Properties button. This will allow you to configure the TCP/IP settings of your PC/Notebook. 3. Select Use the following IP Address radio button and then enter the IP address and subnet mask. Ensure that the IP address and subnet mask are on the same subnet as the device. For Example: Device IP address: 192.168.1.1 PC IP address: 192.168.1.10 PC subnet mask: 255.255.255.0 4.
1. 2. 3. 4. After logging in you will graphical user interface (GUI) of the device. The navigation drop-down menu on left is divided into four main sections: Management: This menu includes the administrator settings, advanced wireless settings such as wireless MAC clone and RTS/fragmentation threshold. Also included are other system related settings such as firmware upgrade, reset to factory defaults, and system date/time configuration.
Status Click on the Status link under the Management menu. The device status page is also displayed once you have logged in. This includes details about the system uptime and firmware, LAN IP address and MAC address and the wireless settings such as the radio status, MAC address, SSID, RF channel, as well as WAN settings.
Statistics Click on the Statistics link on the navigation drop-down menu. This page displays the transmitted and received packet statistics of the wired and wireless interface. Click on the Refresh button to refresh the statistics. Dynamic DNS Click on the DDNS link on the navigation drop-down menu. This feature allows you to maintain your Internet domain name even if you IP address supplied by your ISP is a dynamic one. Enable DDNS: Place a check in this box to enable the DDNS feature.
Time Zone Setting Click on the Time Zone Setting link in the navigation menu. This feature allows you to configure, update, and maintain the correct time on the device’s internal system clock as well as configure the time zone. The date and time of the device can be configured manually or by synchronizing with a time server. Note: If the device losses power for any reason, it will not be able to keep its clock running, and will not display the correct time once the device has been restarted.
Denial of Service (DoS) Click on the Denial of Service link in the navigation menu. This is a security feature that blocks intrusions from the Internet that may disrupt the network service. Enable DoS protection: Place a check in this box to enable the DoS features. You may also enable the other DoS protection features listed below. If you are not sure what the DoS protection feature is used for, it is recommend keeping the feature disabled.
Log Click on the Log link on the navigation drop-down menu. Logs display a list of events that are triggered on the Ethernet and Wireless interface. This log can be referred when an unknown error occurs on the system or when a report needs to be sent to the technical support department for debugging purposes. Enable Log: Place a check in this box to enable the system logging feature. You may also click on system all, which will log wireless and DoS events.
Upgrade Firmware Click on the Upgrade Firmware link on the navigation drop-down menu. This page allows you to upgrade the firmware of the device in order to improve the functionality and performance. Ensure that you have downloaded the appropriate firmware from the vendor’s website. Connect the device to your PC using an Ethernet cable, as the firmware cannot be upgraded using the wireless interface. Click on the Browse button to select the firmware and then click on the Upload button.
Restore the Configuration from a File Click on the Save / Reload Settings link on the navigation drop-down menu. This option allows you to restore a backup configuration from a file to the device. Click on the Browse button to select the file and then click on Upload button. A page indicating the reloading process will be displayed. Please wait while the system restarts and load the configuration page based on the pervious IP address.
Administrator Settings Click on the Password link on the navigation drop-down menu. This page allows you to configure the password to access this device from the web-browser. Note: The default user name and password of the device is admin User Name: Specify a user name that will be used to connect to the device. New Password: Specify a password. Confirmed Password: Re-type the password. Click on the Apply Changesto save the changes.
LAN Settings – Static IP Click on the LAN Interface link on the navigation drop-down menu. This feature allows you to configure the LAN interface using a static IP address or as a DHCP server/client. This IP address is also used to access the web-based interface. IP Address: Enter an IP address for this device. Subnet Mask: Enter the subnet mask for this IP address. Default Gateway: Enter the IP address of the default gateway.
LAN Settings – DHCP Client Click on the LAN link on the navigation drop-down menu. This feature allows you to configure the LAN interface using a static IP address or as a DHCP server/client. This IP address is also used to access the web-based interface. DHCP: If you select DHCP, you are not required to enter the rest of the fields, as the IP address will be provided to the device by the AP or DHCP server 802.
LAN Settings – DHCP Server Click on the LAN link on the navigation drop-down menu. This feature allows you to configure the LAN interface using a static IP address or as a DHCP server/client. DHCP stands for Dynamic Host Configuration Protocol. The DHCP section is where you configure the built-in DHCP Server to assign IP addresses to the computers and other devices on your local area network (LAN). In most situations, the router provides DHCP services, and you can leave this option disabled.
WAN Settings – Static IP Click on the WAN link on the navigation drop-down menu. This feature allows you to configure the WAN interface using a static IP address, DHCP Client, PPoE, or PPTP. WAN Access Type: Select Static IP from the drop-down list. This type of connection is used when your ISP has provided you a dedicated IP address. IP Address: Enter an IP address for this device, which is assigned by your ISP. Subnet Mask: Enter the subnet mask for this IP address, which is assigned by your ISP.
Enable IPsec pass through on VPN connection: Place a check in this box to enable the pass through of PPTP packets on a VPN connection. Enable IPsec pass through on VPN connection: Place a check in this box to enable the pass through of L2TP packets on a VPN connection. Click on the Apply Changesto save the changes. WAN Settings – DHCP Client Click on the WAN link on the navigation drop-down menu.
Enable uPNP: Place a check in this box to enable UPnP. It is recommended to enable this feature as it’s used by several applications. Enable PING Access on WAN: Place a check in this box if you would like the device to be pinged from the WAN side (ISP). Enable Web Sever Access on WAN: Place a check in this box if the static IP address if used for a web-server.
Connection Type: Select Continuous (always online), Connect on Demand (connect to the ISP only when you click on a website), or Manual (connect to the ISP only when you click on a ‘Connect’ button) from the drop-down list. Idle Time: The PPPoE service can automatically disconnect if the connection is idle. Specify the number of minutes after between 1 and 100.
WAN Access Type: Select PPTP from the drop-down list. This type of connection is used when your ISP has provided you a dedicated IP address. IP Address: Enter an IP address for this device, which is assigned by your ISP. Subnet Mask: Enter the subnet mask for this IP address, which is assigned by your ISP. Default Gateway: Enter the IP address of the default gateway, which is assigned by your ISP.
Wireless Click on the TCP/IP Settings link on the navigation drop-down menu. You will then see five options. Basic Settings, Advanced Settings, Security, Access Control, and WDS Settings. Each option is described below. Wireless Basic Settings Click on the Basic Settings link on the navigation drop-down menu.
Show Active Clients: Click on this button to view a list of clients that are associated with this device. Click on the Apply Changesto save the changes. Wireless Advanced Settings Click on the Advanced Settings link on the navigation drop-down menu. These options allow you to configure the authentication type, fragment threshold, RTS threshold, beacon interval, and RF output power. Authentication Type: Select Open System, Shared Key or Auto as an authentication type.
Beacon Interval: Beacons are packets sent by a wireless Access Point to synchronize wireless devices. Specify a Beacon Period value between 20 and 1024. The default value is set to 100 milliseconds. Data Rate: Select a transmission rate from the drop-down list. It is recommended to use the auto option. Preamble Type: Select a long or short preamble type. For best performance, it is recommended that the preamble type of the AP matches that of the client.
Wireless Security To protect your privacy this mode supports several types of wireless security: WEP WPA, WPA2, and WPA-Mixed. WEP is the original wireless encryption standard. WPA provides a higher level of security. The following section describes the security configuration in detail. Wireless Security - Disabled . Encryption: Select None from the drop-down list in order to disable wireless security. Click on the Apply Changesto save the changes.
Encryption: Select WEP from the drop-down list in order to enable WEP security and then click on the Set WEP key button. . Key Length: Select a 64-bit or 128-bit WEP key length from the drop-down list. Key Format: Select a key format such as HEX or ASCII from the drop-down list. Encryption Key: You may use up to four different keys for four different networks. Select the current key that will be used. Click on the Apply Changes to save the changes.
Wireless Security – WPA / WPA2-Mixed Select WPA or WPA2-Mixed from the drop-down list if your wireless network uses WPA encryption. WPA (Wi-Fi Protected Access) was designed to improve upon the security features of WEP (Wired Equivalent Privacy). The technology is designed to work with existing Wi-Fi products that have been enabled with WEP.
Click on the Apply Changes to save the changes. Wireless Access Control Click on the Access Control link on the navigation drop-down menu. The MAC address filter section can be used to filter network access by machines based on the unique MAC addresses of their network adapter(s). It is most useful to prevent unauthorized wireless devices from connecting to your network. A MAC address is a unique ID assigned by the manufacturer of the network adapter.
WDS (Wireless Distribution System) Click on the WDS link on the navigation drop-down menu. The Wireless Distribution System feature configures this device as a repeater and therefore extends the range/coverage area of the wireless network. Enable WDS: When WDS is enabled, this access point functions as a wireless repeater and is able to wirelessly communicate with other APs via WDS links.
WDS Security Click on the Set Security button to configure one of the security options for the WDS. Options available are WEP, WPA and WPA2, and you must configure the same security setting on each Access Point linked with this one. WDS Security - None Encryption: Select None from the drop-down list in order to disable wireless security. Click on the Apply Changes to save the changes. WDS Security – WEP 64/128 Select WEP from the drop-down list if your wireless network uses WEP encryption.
Encryption: Select a 64-bit or 128-bit WEP encryption from the drop-down list. Key Format: Select a key format such as HEX or ASCII from the drop-down list. WEP Key: Specify the WEP key Click on the Apply Changes to save the changes and then click on the Close button. WDS Security – WPA (TKIP), WPA2 (AES) Select WPA or WPA2-Mixed from the drop-down list if your wireless network uses WPA encryption.
Encryption: Select a WPA or WPA2 encryption from the drop-down list. The encryption algorithm used to secure the data communication. TKIP (Temporal Key Integrity Protocol) provides per-packet key generation and is based on WEP. AES (Advanced Encryption Standard) is a very secure block based encryption. Note that, if the bridge uses the AES option, the bridge can associate with the access point only if the access point is also set to use only AES.
Firewall Click on the Firewall link on the navigation drop-down menu. You will then see six options. Port filtering, IP filtering, MAC filtering, Port filtering, URL filtering, DMZ. Each option is described below. Port Filtering Select Port Filtering from the drop-down list This feature is used to restrict certain types of data packets on certain port numbers from your local network and the Internet. These filters can be used for securing and restricting your network.
You may place a check in the box on under the Select column and then click on Delete Selected to remove the selected entry. You may also click on Delete All to delete all the filtering entries. IP Filtering Select IP Filtering from the drop-down list. This feature is used to restrict certain IP address from using certain protocols over the Internet. These filters can be used for securing and restricting your network. Enable IP Filtering: Place a check in this box to enable this feature.
MAC Filtering Select MAC Filtering from the drop-down list. This feature is used to restrict certain MAC address from accessing the Internet. These filters can be used for securing and restricting your network. Enable MAC Filtering: Place a check in this box to enable this feature. MAC Address: Enter the MAC address of the device on the local network. Comment: You may add a comment to define the filter. (optional) Click on the Apply Changes button to add the filter to the table.
Port Forwarding Select Port Forwarding from the drop-down list. This feature is used to automatically redirect common network services to a specific machine behind the NAT firewall. These settings are only necessary if you wish to host some sort of server like a web server or email server on the private local network behind the NAT firewall. Enable MAC Filtering: Place a check in this box to enable this feature. Local IP Address: Enter the IP address of the device on the local network.
URL Filtering Select URL Filtering from the drop-down list. This is a type of parental control feature used to restrict certain websites form being accessed through your network. These filters can be used for securing and restricting your network. Enable URL Filtering: Place a check in this box to enable this feature. URL Address: Enter the URL of the website. Click on the Apply Changes button to add the filter to the table.
DMZ Select DMZ from the drop-down list. A demilitarized zone is used to provide Internet services without sacrificing unauthorized access to its local private network. Typically, the DMZ host contains devices accessible to Internet traffic, such as web, FTP, email and DNS servers. Enable DMZ: Place a check in this box to enable this feature. DMZ Host IP Address: Enter the IP address of the DMZ host. Click on the Apply Changes button to add the filter to the table.
Appendix A – Specifications Standards IEEE802.11b/g, IEEE802.1x, IEEE802.3, IEEE802.3u Wi-Fi data speed IEEE 802.11b: 11/5.5/2/1Mbps IEEE 802.11g: 54/48/36/24/18/12/9/6Mbps Compatibility IEEE 802.11g/ IEEE 802.11b Power Requirements Power Supply: 90 to 240 VDC 10 (depends on different countries) Device: 12 V/ 1.3A Status LEDs 4*LAN : Link/Activity WLAN : Link/Activity Power : On/Off Internet : On/Off/Activity Regulation Certifications FCC Part 15/UL, ETSI 300/328/CE RF Information Frequency Band 2.
Appendix B – FCC Interference Statement Federal Communication Commission Interference Statement This equipment has been tested and found to comply with the limits for a Class B digital device, pursuant to Part 15 of the FCC Rules. These limits are designed to provide reasonable protection against harmful interference in a residential installation.
Industry Canada statement: This device complies with RSS-210 of the Industry Canada Rules. Operation is subject to the following two conditions: (1) This device may not cause harmful interference, and (2) this device must accept any interference received, including interference that may cause undesired operation. IMPORTANT NOTE: Radiation Exposure Statement: This equipment complies with IC radiation exposure limits set forth for an uncontrolled environment.