
Installation Guide
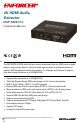


4K HDMI Audio Extractor
SECO-LARM U.S.A., Inc. 3
Overview
Installation
1. Determine the location of the extractor and how much HDMI and audio cable is needed.
2. Connect an HDMI cable between the extractor's HDMI IN and the HDMI source device.
3. Connect another HDMI cable between the extractor's HDMI OUT and the HDMI display.
4. Connect an audio device to the extractor's Optical Out port.
5. Connect the extractor's L/R Out to the L/R audio input of another device (amplifier, powered
speakers, TV input, etc.).
6. Select the desired audio output using the Audio Selector switch, choosing between TV,
Bitstream, or 2CH.
a. TV – sets the audio output to the standard TV audio format.
b. Bitstream – sets the audio output to a bitstream format, including DTS5.1, Dolby 5.1,
PCM2.0, etc.
c. 2CH – sets the audio output to the standard stereo LPCM format.
7. Connect the power adapter and power up the extractor and other connected device (the use of
a surge protector is highly recommended).
NOTES
• All wiring connections should be done before power is connected. Unplug the power adaptor
before connecting or disconnecting any wiring.
• Premium high-speed HDMI cables are
highly recommended.
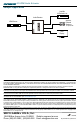
• HDMI cable lengths should be kept within
the maximums shown in Fig. 1.
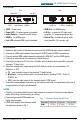
5VDC
Front Rear
Optical Out
HDMI Out
L/R Out
Power LED
Audio Selector
HDMI In
Link LED
• 5VDC – Power input
• Power LED – On when system is powered
• Audio Selector – Select the audio format
• HDMI In – to HDMI source
• Link LED indicates HDMI input is detected
• HDMI Out – to HDMI display
• L/R Out – to external L/R audio input
(amplifier, TV, powered speakers, etc.)
• Optical Out – to external optical audio
input (amplifier, AV recorder, etc.)
Fig. 1 – Maximum Cable Length Chart
Resolution
4K@60MHz 4K@30MHz
1080p@60MHz
HDMI 16' (5m) 32' (10m) 50' (15m)