
Specifications
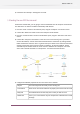

5.3 Adding the input folder
1. Make sure the tutorial flow is selected in the Flows pane.
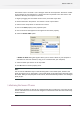
2. In the Elements pane, make sure the "Basics" group is displayed (click on the title of the
group if it is currently hidden).
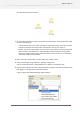
3. In that group click on the icon called "Folder" and drag it onto the canvas. Drop the folder
somewhere on the left-hand side of the canvas.
The name of the folder automatically becomes "Folder 1" after you have dropped it onto the
canvas.
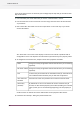
4. Click on "Folder 1" to select it.
5. Click on the name field itself and type a new name for the folder: "Input Folder".
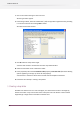
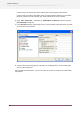
6. With the input folder still selected, in the Properties pane, set the value for the Path property
to auto-managed.
This means that the folder is created and maintained by Switch. This is what we want for the
input folder, where we will gather all input files. You will see later how to explicitly set the
location of a folder when it is important to have it on a certain fixed location.
7. Proceed to the next topic: Sorting between PDF and non-PDF files.
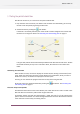
5.4 Sorting between PDF and non-PDF files
The first thing we will make our flow do is to distinguish between PDF files and other files.
1. Create two more folders to the right of the input folder.
2. Name those folders as "PDF Files" and "Other Files".
52
Enfocus Switch 10