
Specifications


Handling jobs being held in a Checkpoint
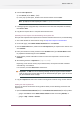
To handle a job (that is, move it along the flow) after reviewing it:
• Click the button for the appropriate connection at the bottom of the job card
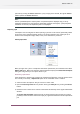
• Select the job and click the Process button to open the Processing jobs panel
• View information associated with the job in the left panel named Job Info
• If the Checkpoint defines any editable data fields, complete their values in the "Metadata"
section on the right named Job ticket.
• Select the appropriate checkboxes or select the appropriate options in the drop down
menu at the bottom section named Route to. Single routing decisions have a drop down
menu from which users can select a connection. When multiple routing decisions are
supported, checkboxes are present for every connection.
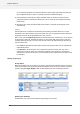
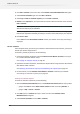
The buttons shown in this section of the window depend on the configuration settings of the
Checkpoint (see designing a flow). Here is another example of a Checkpoint that allows to send
out multiple copies of the job:
Click the Process button to proceed with job processing.
Note: When multiple jobs are selected (and SwitchClient is able to handle them simultaneously),
the user can insert metadata and take routing decisions for all the jobs at once. For a multi-select
it is not possible to set metadata or take routing decisions for individual jobs. Jobs can be
162
Enfocus Switch 10