
Specifications

Since this example focuses on SwitchClient features, there is a lot of interaction with human
operators and little automated processing (other than moving jobs around). Real-life flows would
probably include processing steps such as preflight or color conversion.
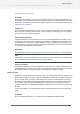
The Submit point to the left (Creatives) allows submitting jobs to the flow in a controlled fashion
using SwitchClient. The user's name is automatically remembered; multiple users can use the
same Submit point since each user is identified to PowerSwitch/ FullSwitch through his/her user
name and password. The "Set User Name" script serves to add a user name for jobs submitted
through a regular hot folder (Henry).
The first Checkpoint (Visual Proof) holds the incoming jobs for inspection by a SwitchClient user.
The names of the output connections (Approve and Decline) are displayed in SwitchClient as
buttons. Pressing one of these buttons moves a job along the corresponding connection.
The second Checkpoint (Output Jobs) allows a SwitchClient user to decide how the jobs will be
stored or processed. This Checkpoint is configured to allow multiple outputs at the same time;
for example both "Store in DAM" and "Create Proof".
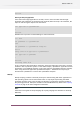
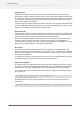
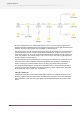
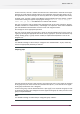
Setting up a Submit point
A Submit point (Creatives in the example flow) offers properties to configure its behavior. For
example, a Submit point may require that the SwitchClient user enters one or more data fields
before submitting a job. This screen grab shows how the SwitchClient user must enter a valid
Job ID:
146
Enfocus Switch 10